


13
Section 1: Assembly & Set-up
12/15/15
SBD3596 & SBD35108 Snow Blowers 370-347M
Table of Contents
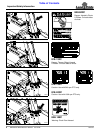
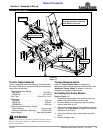
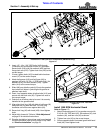
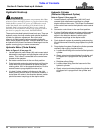
6. Insert 1/2"- 13 x 1 3/4" GR5 bolts (#16) through
L-brackets (#8) and reducer mount (#7) as shown.
Secure bolts (#16) with flat washers (#2B) and hex
flange lock nuts (#1B). Tighten lock nuts (#1B) to the
correct torque.
7. If loose, tighten bolts (#15) located behind reducer
mount (#7) to the correct torque.
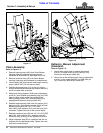
8. Attach bell spacer (#10) and bell base (#6) to
gearbox (#5) with 1/2"-20 x 1" GR5 bolts (#14), flat
washers (#18), and lock washers (#19). Tighten
bolts (#14) to the correct torque.
9. Slide 1000 rpm driveline yoke (#12) onto the gearbox
input shaft until holes in yoke align with groove on
gearbox input shaft.
10. Insert, from opposite sides, driveline bolts (#13) and
secure with hex lock nuts (#3). Tighten lock nuts to
the correct torque.
11. Push/pull on driveline yoke to be sure it is securely
fastened to the gearbox shaft.
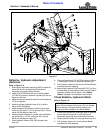
12. Align slots in bell ring (#9) with bolts in bell base (#6)
and push bell ring onto the bolts. Turn bell ring
clockwise until slots come against bolts (#9).
13. Secure bell ring (#9) with knob (#20). Hand tighten
knob.
14. Adjust hitch forward 4". Refer to “Hitch Adjustment”
on page 22 for detailed instructions.
15. Driveline installation instructions must be rechecked
for field conversion units to verify proper fit-up. Refer
to “Driveline Installation” on page 16.
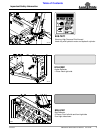
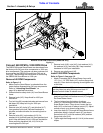
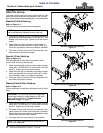
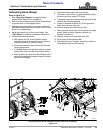
Installation of Horizontal Guard For 1000 RPM
Figure 1-7
Install 1000 RPM Horizontal Guard
Refer to Figure 1-7:
1. Attach horizontal guard (#1) to gearbox mount with
5/16-18 x 3/4" GR5 bolts (#2), flat washers (#5), lock
washers (#4), and hex nuts (#3) as shown.
2. Tighten hex nuts (#3) to the correct torque.
3. Secure opposite end of horizontal guard with hand
knob (#6). Hand tighten knob.
37319
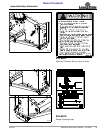
Installation of 1000 rpm Drive Components (SBD35108 Only)
Figure 1-6
37317