


10
Section 1: Assembly & Set-up
SBD3596 & SBD35108 Snow Blowers 370-347M
12/15/15
Table of Contents
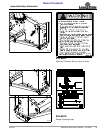
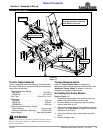
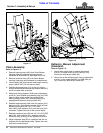
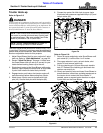
Deflector Adjustment, Manual Option
Figure 1-3
Deflector, Manual Adjustment
(Standard)
Refer to Figure 1-3:
1. Attach lower single hole in manual adjustment
arm (#1) to lower chute lug (#2A) with pin (#3).
Secure pin with hairpin cotter (#4).
2. Attach one of the multiple upper holes in adjustment
arm (#1) to the upper deflector lug (#2B) with pin
(#3). Secure pin with hairpin cotter (#4).
35713
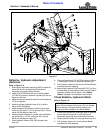
Chute Assembly
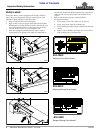
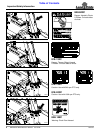
Figure 1-2
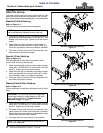
Chute Assembly
Refer to Figure 1-2:
1. Remove bearing strap (#4A) from Snow Blower
housing. Keep all removed components and
hardware for attachment of discharge chute (#1).
2. Remove rotational stop (#5) from Snow Blower
housing. Keep stop and hardware for reattachment.
3. Loosen bolts (#8) securing the remaining 2 bearing
straps (#4B & #4C). Do not remove bolts.
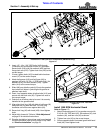
4. Position discharge chute (#1) so that it is facing
straight forward as shown and stop rotation bolts (#7)
are on the back side as shown.
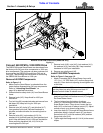
5. Keep chute facing forward. Slide base of discharge
chute (#1) over UHMW chute bearing ring (#15) until
base of chute is fully under the remaining two
bearing straps (#4B & #4C) and sprocket (#2) is
engaged with hydraulic drive sprocket (#3).
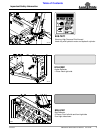
6. Reattach bearing strap (#4A) with flat washer (#12),
bearings (#16), and machine washer (#14) to Snow
Blower housing with 3/8"-16 x 1 1/2" GR5
bolts (#8A), lock washers (#13), and hex nuts (#10)
as shown. Tighten hex nuts to the correct torque.
7. Reattach rotational stop (#5) with 1/4"-20 x 3/4" GR5
bolts (#6), lock washers (#11), and hex nuts (#9).
Draw nuts (#9) up snug, do not tighten at this time.
8. Adjust rotational stop (#5) to a position that will not
interfere with the discharge chute. Tighten hex nuts
(#9) to the correct torque.
FRONT
35712