


52
Troubleshooting and handling care
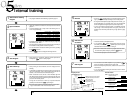
Troubleshooting
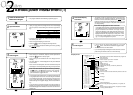
Connect the AC adaptor correctly.
(see page 14)
Is the power switch on?
Problem Item to check Countermeasure
Is the power supply connected?Display does not appear.
Turn the power on.
Replace the AC Adapter if its inte-
rior circuit or the cable is dam-
aged.
Isn't the cable of the AC Adapter
damaged?
Didn't you select "not to use" the
printer with the selector switch on
the back panel of the control unit?
Set the select switch No.4 to OFF.
(see page 8)
Printer does not work.
Press the button on the Con-
trol Unit to let the symbol
show up. But if the select switch
No.4 on the back of the control
unit is ON, the symbol doesn't
appear even if you press the but-
ton.
Is the symbol shown on the
LCD?
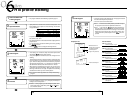
Isn't the paper jammed? Remove the jammed paper. (see
page 51)
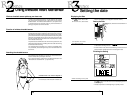
Did you set the date? Set the date correctly (page 49)Date memory is incorrect.
Are the backup batteries installed?
If not, the date memory is lost each
time you turn off the power.
Load the backup batteries. (see
page 8)
Replace the backup batteries, be-
cause they have worn out. (see
page 8)
Isn't the symbol shown on the
LCD?
Hold the card yellow arrow side
up, and insert to the direction of
arrow.
Isn't the data card reversed?ERROR or irregular display ap-
pears when you insert the data
card.
Didn't you specify two or more pro-
grams, or open unnecessary holes?
Refer to P.42~43 and specify the
program and conditions correctly.
Didn't you insert the card too
quickly?
Insert the card slowly.
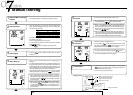
Is the pulse sensor attached cor-
rectly to your earlobe?
The pulse rate is not displayed, re-
maining "0".
Insert the sensor plug securely into
the sensor jack, and check the
pulse sensor function according to
page 11. If the sensor cable proves
to be broken, replace the pulse
sensor (part #1655210).
Attach the sensor correctly to your
earlobe and take care not to swing
the sensor or sensor cable during
the exercise. If the sensor cable
proves to be damaged, replace the
whole pulse sensor with a new one.
Is the pulse sensor correctly at-
tached to your earlobe?
Is the sensor plug completely in-
serted into the sensor jack?
Problems noted in the following chart are not disorders. Prior to seeking
repair, read the contents of the entire chart first.
The pulse rate increases abnor-
mally.
Isn't the sensor cable damaged?
53
Is the weight unit correct? Set the weight unit correctly. (see
page 8)
Input your age correctly to prevent
the alarm from ringing unduly.
Check if sensor plug is completely
connected.
Handling
For longer use of the Ergociser™ EC-1600, observe the following
precautions.
• Do not disassemble the main and control units. In case of prob-
lems contact your dealer where the unit was purchased.
• Avoid using the Ergociser™ EC-1600 in a high temperatures or in
high humidity. Also, do not splash the unit with water.
• Handle the pulse sensor carefully. If strongly pulled out the cable
may become disconnected.
• When the EC-1600 is not in use, shut the power switch OFF and
disconnect the power cord from the outlet.
• Do not wipe the main unit with organic solvents such as thinner,
kerosine, gasoline and alcohol. When dirty, wipe the unit with a
cloth soaked in a neutral detergent, then wipe well with a dry
cloth.
• Do not place the EC-1600 in direct sun light.
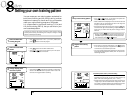
Problem Item to check Countermeasure
The evaluation of fitness level
seems incorrect.
Did you select the correct fitness
level evaluation table?
Check the selector switch on the
back panel of the control unit. (see
page 8~9)
Buzzer keeps sounding.
Isn't the upper pulse limit alarm
ringing due to the excess of your
pulse rate during the exercise?
The program is suspended half-
way.
Isn't the pulse limit setting too low
due to an incorrect age input?
The pitch sound doesn't ring. Press the button on the control
unit to let the symbol show up.
Is the symbol shown on the
LCD?
Unit does not give pitch sound if
plug is out of jack.
Are the pedals firmly attached to
the crank? If not, noise may be pro-
duced.
Clattering noise is heard with the
pedal rotation.
Attach the pedals firmly.