


14
• Attach the pulse sensor to your
earlobe. When it is cold, rub your
earlobe to facilitate blood circula-
tion before attaching the pulse
sensor.
Caution: Do not use any AC
adaptor other than the one
supplied with the Model EC-
1600.
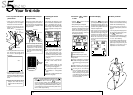
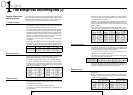
TIME
AUTO
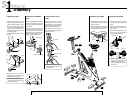
1. Turn on power and attach
pulse sensor
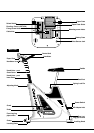
• Insert the DC connector of the
AC adaptor into the AC adapter
inlet at the rear of the exerciser.
• Insert the AC plug of the AC
adaptor into any household AC
outlet (120V).
2. Insert the start card (red
card provided)
• Find the red card (start card) in
the packaging of the exerciser. In-
sert this card into the appropriate
slot (card inlet) as shown in the
diagram below.
Your first ride
• Turn on power switch. The control
unit should make a beep sound
and "AUTO" should appear on
the screen.
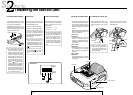
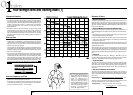
3. Checking the screen
display
• The display that appears on the
screen should be as described be-
low. If this display does not ap-
pear, pull the card out and slowly
insert it again. The numbers in the
display represent training condi-
tions.
Caution: Use only the red card
at this stage. It is a sample card
with the exercise data already
registered in it. The unit will
not work with the black cards
since they do not contain any
data yet.
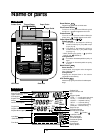
TIME
PLL
TM
AGE
PRF
min:sec
kg•m
HILL
2
3
1
4
5
6
1 Age is shown by the figure "50"
2 "150" is the upper-limit pulse
rate set by the machine (200 -
age). If this pulse rate is ex-
ceeded during training, an alarm
will sound and the pedal resis-
tance will become to minimum
(0.5kg·m).
3 Exercise time is shown by
"16:00", which means 16 min-
utes.
4 "HILL" which is short for "hill
profile training" shows the type
of training to be engaged in.
5 "1" indicates the shape of the hill
to be climbed. "1" is the gentlest
slope.
6 Changes of pedal resistance are
shown on the graph.
Remark : You may change data at any time. The
and buttons will raise or lower any of the num-
bers discussed above. Press the
MODE
button to
move to the next number, which will flash on and off
when it is eligible for changing. Now, however, the
goal is to get you acquainted with Model EC-1600, so
if you change any of the numeral values, please return
them to their original setting.
power switch
card inlet
start card
start card
Insert this
direction
AC adapter inlet
DC
connector
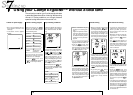
15
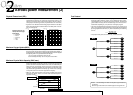
TIME
kg•m
EC
kcal
watt
kg•m
rpm
HILL
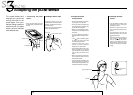
4. Press the
ADV
button
to start
• Depress
ADV
button. This will
activate the printer.
• Start pedaling at a low speed.
• When the printer stops, a display
like that in the diagram below will
appear on the screen. The num-
bers on this screen represent your
own present condition, and they
will change frequently.
5. Calorie display
• Pushing the
MODE
button gives
you the option of viewing a calorie
consumption display (calorie con-
sumed from the beginning of the
present training session until now)
instead of elapsed time.
• Now you are on the exerciser for
your first ride. As you train, pedal
resistance will change, energy ex-
penditure will change, and your
pulse rate will also change. The
Model EC-1600 lets you keep
track of all this information while
you train.
6. When you finish
• When 16 minutes have elapsed, a
buzzer will sound and the training
session will automatically stop.
• The printer prints out the E.C.
(Energy Consumption) and then
stops.
• You may stop exercise program at
any time during workout by press-
ing
ADV
button twice.
• The liquid crystal display on the
screen will return to initial display,
"AUTO" alone flashing.
• The Model EC-1600 Cateye Ergo-
ciser™ function that we have ex-
plained up to this point is only the
beginning. Let us move on to an
explanation of other functions.
1 Heartbeats per minute.
2 Pedal revolutions per minute.
3 Elapsed time since start of train-
ing session.
4 Energy expenditure, expressed
in watts. The higher the number,
the more energy you are expend-
ing.
5 Pedal resistance. The higher the
number, the harder it is to pedal.
6 As time goes on, the blinking
row in the graphic part will shift
one by one toward the right
hand. According to the position
of the blinking row you can find
how far you have progressed in
the current session.
TIME
kg•m
TM
min:sec
watt
kg•m
rpm
HILL
1 2
3
4
5
6