


23
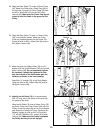
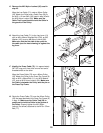
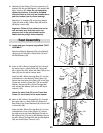
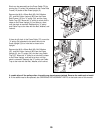
61. Attach the Press Cable (72) to the remaining “U”-
bracket (33) with an M8 Washer (100) and an M8
Nylon Locknut (86). Note: Do not completely
tighten the Locknut; it should be threaded
onto the Cable so that only two threads show
past the Locknut (see the inset drawing).
Attach the “U”-bracket (33) to the Long Weight
Tube (43) with an M8 x 45mm Bolt (96) and an
M8 Nylon Locknut (86).
Important: Follow all five cables from end to
end and make sure that they rest in the
grooves of all of the pulleys and that the
cables and the pulleys move smoothly.
61
62
63
64
79
79
86
100
99
25
23
Serial
Number
Decal
91
30
99
10
79
24
30
98
91
5
79
103
99
99
103
4
99
72
72
33
96
86
43
86
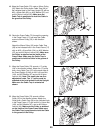
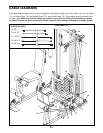
Seat Assembly
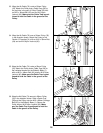
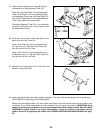
62. Locate and open the parts bag labeled “SEAT
ASSEMBLY.”
Attach the Butterfly Backrest (25) to the Butterfly
Upright (4) with two M6 x 65mm Bolts (79) and
two M6 Washers (99).
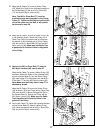
63. Insert an M6 x 62mm Carriage Bolt (91) through
the center hole in a Seat Plate (30). Using two
M6 x 16mm Bolt (98), attach the Seat Plate to the
Seat (23) with the serial number decal.
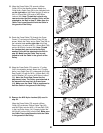
Insert the M6 x 62mm Carriage Bolt (91) into the
indicated hole in the Butterfly Seat Frame (10).
Secure the other end of the Seat (23) to the Seat
Frame with an M6 x 65mm Bolt (79) and an M6
Washer. Secure the M6 x 62mm Carriage Bolt
with another M6 Washer (99) and an M6 Nylon
Locknut (103).
Attach the other Seat (23) to the Press Seat
Frame (12, not shown) in the same manner.
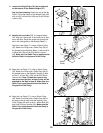
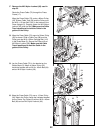
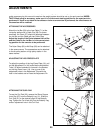
64. Insert an M6 x 62mm Carriage Bolt (91) through
the center hole in a Seat Plate (30). Attach the
Seat Plate to the Press Backrest (24) with two M6
x 16mm Bolt (98).
Insert the M6 x 62mm Carriage Bolt (91) into the
indicated hole in the Press Upright (5). Secure
the other end of the Press Backrest (24) with an
M6 x 65mm Bolt (79) and an M6 Washer. Secure
the M6 x 62mm Carriage Bolt with an M6 Washer
(99) and an M6 Nylon Locknut (103).
98