


11
105
92
29
28
67
8
90
90
90
26
27
4
7
5
8
9
28
5
77
92
35
15
16
38
29
105
90
90
90
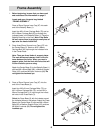
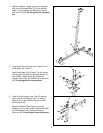
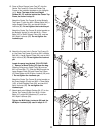
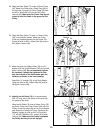
15. Press a 50mm Square Inner Cap (67) into the
Center Top Frame (8). Place the Center Top
Frame on the indicated brackets on the Uprights
(4, 5). Note: The tops of the four Weight
Guides (26, 27) must be behind the Center Top
Frame, as shown in step 16.
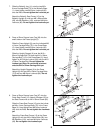
Attach the Center Top Frame (8) to the Butterfly
Top Frame (7) with two M10 x 69mm Bolts (92), a
Large Support Plate (29), and two M10 Nylon
Locknuts (90). Do not tighten the Locknuts yet.
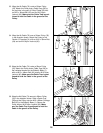
Attach the Center Top Frame (8) to the bracket on
the Butterfly Upright (4) with two M10 x 72mm
Bolts (105), a Small Support Plate (28), and two
M10 Nylon Locknuts (90). Do not tighten the
Locknuts yet.
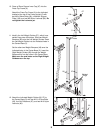
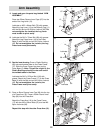
16. Attach the the rear hole in Center Top Frame (8)
to the Press Top Frame (9) with an M10 x 69mm
Bolt (92), a Large Support Plate (29), and an M10
Nylon Locknut (90). Do not tighten the Locknut
yet.
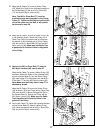
Locate the parts bag labeled “PULLEY BAG
1.” Remove a 90mm Pulley (35) from the bag.
Slide the Pulley and a Cable Trap (38) onto an
M10 x 97mm Bolt (77). Slide the Bolt through the
Large Support Plate (29) and Press Top Frame
(9). Hand tighten an M10 Nylon Locknut (90) onto
it. Do not tighten the Locknuts yet.
Attach the Center Top Frame (8) to the bracket on
the Press Upright (5) with two M10 x 72mm Bolts
(105), a Small Support Plate (28), and two M10
Nylon Locknuts (90). Do not tighten the
Locknuts yet.
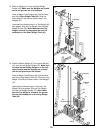
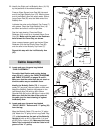
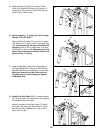
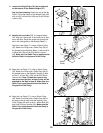
17. Attach each set of Weight Guides (26, 27) to the
Center Top Frame (8) with four M10 x 91mm
Bolts (101), eight M10 Washers (97), and four
M10 Nylon Locknuts (90).
Tighten the M10 Nylon Locknuts (90) and the
M8 Nylon Locknuts (86) used in steps 2–17.
17
90
90
97
26
27
101
101
8