


Page 46
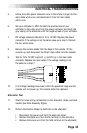
• Place a short wire with alligator clips on the B+ terminal and the
field (FLD) terminal of the alternator.
• Step on the machine for approximately 10 to 15 seconds.
• If full resistance is achieved during this time, your alternator
has correct current flow. If no resistance is achieved, replace
the alternator.
Diode Test
13. Remove the brown wire and diode from the field terminal of the
alternator and set your voltmeter to the Ohms setting.
14. Place one lead from the voltmeter on each end of the diode, and then
reverse the leads. A diode that is good will show a high reading in
one direction and a low reading when the leads are reversed.
Replace the diode if the readings recorded are both high or both low.
Resistor Test
15. Remove one wire from the load resistor (see Final Assembly Figure)
and place one lead from the voltmeter on each of the threaded posts
on the load resistor. Replace the load resistor if the voltmeter does
not read 0.5 Ohms (± 10%).
4600/4400 CL
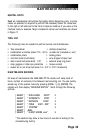
Battery Test
1. Remove the mid cover and top covers and unplug the battery from
the power control board. Locate pins #1 & 2 in the end of the cable.
Use a voltmeter to verify that the voltage is a minimum of 6.1 VDC.
Reconnect the battery back to the power control board and install the
battery charger for at least 24 hours if the voltage measured is below
6.1 VDC. Note: You can use the machine while the battery recharger
is connected.
2. Remove the console knobs from the back of the console, lift the
console up, and disconnect the main cable from the console.
ELECTRICAL TROUBLESHOOTING