6300/6310 Treadmill Electronics Repair Manual – Reference
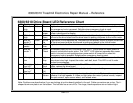
6300/6310 Drive Board LED Reference Chart
LED Position Color Name Action
1 Mid left,
high
Red Power Lights when power switch is on; extinguishes when power switch is turned off or when
the emergency knob is pressed. Relights when emergency knob is reset.
2 Left top Green VCC
power
Lights when power switch is on. Indicates that drive board VCC circuit is operating;
power is being sent to display.
3 Mid left
high
Green Incline
Down
Lights when incline operates down. Indicates that the display incline down signal has
arrived at the drive board and the drive board is putting out power to the incline motor.
4 Mid left,
under 3
Green Incline
Up
Lights when incline operates up. Indicates that the display incline up signal has arrived
at the drive board and the drive board is putting out power to the incline motor.
5 Mid left,
center
Red Incline
Error
Lights to indicate that the incline is overextended. Recalibration is necessary.
6 Mid left,
under 1
Red “SOFT”
Check
Immediately after the unit is turned on, the “SOFT” circuit shuts off motor power to
prevent uncontrolled motor action. The “SOFT” LED lights two seconds after power
switch is turned on; extinguishes when power switch is turned off or when the
emergency knob is pressed. Relights when emergency knob is reset.
7 Mid right,
low
Green High
Amp
Lights when drive board current restriction circuit is activated. This occurs when the
amp draw is too high. Inspect the motor, walk belt, deck. This LED is not lit under
normal circumstances.
8 Mid right,
low, by 7
Red IGBT
Short
Lights when the IGBT has shorted. This LED is not lit under normal circumstances. If it
lights, replace the drive board.
9 Mid right,
low, by 7
Red Belt
Pull
Lights normally. Turns off if belt is pulled faster than speed setting.
10 Right low Green Optic
Sensor
Lights when the optic sensor signal enters the drive board. Flickers at low speeds;
remains lit at high speeds. If it does not light when the motor flywheel moves, inspect
the optic sensor, optic sensor wheel, and related wires.
Note: Positions are described as if you are looking at a drive board installed in the unit. Cable connectors are on top. The L-
shaped aluminum plate is on the bottom. The left side has a row of ICs. Two large, black capacitors are on bottom right.
REF.01


