


page 9
Setting Up the Low Impact Treadmill
2
CAUTION: Do not remove or otherwise bypass
the 3-prong plug with an adapter or extension
cord in order to use a non-grounded outlet.
Electrical damage can occur if the treadmill is
connected to an improper power source.
You do not need any special knowledge or experience to set up a M9.21i or M9.21si treadmill.
However, you must review and follow the instructions in this manual. If you do not assemble and
use the treadmill according to the following guidelines, you might void the Precor limited warranty.
Installation Requirements
Follow these installation requirements when installing the treadmill:
• Acquire the appropriate tools. In addition to the tools supplied in the hardware kit, you will
need a phillips head screwdriver to remove the hood from the treadmill.
• Fill out and mail the limited warranty card. The serial number is printed on a label located
underneath the treadmill on the left, rear corner of the running bed. Write the serial number
onto the limited warranty card and in this manual before assembling the treadmill. Refer to
Obtaining Service
.
• Set up the M9.21i or M9.21si treadmill on a solid, flat surface. Do not install the treadmill
on deeply padded, plush, or shag carpeting due to possible damage to the carpet and
machine. If the treadmill is installed in a carpeted area, place a piece of heavy cardboard,
plywood, or other solid, smooth, flat surface under the unit. If the floor is not even, the
running belt will not track properly. Refer to
Checking the Alignment of the Running Belt.
• Locate the treadmill at least 4 feet from walls and furniture. Be sure to provide ample space
in front of the machine to allow easy access to the ON/OFF switch. Open space to the sides
and back of the machine makes for a safer mount and dismount and easier belt adjustment.
• Use a standard 120-volt household outlet. The M9.21i or M9.21si treadmill is for household
use only. Precor recommends plugging the treadmill into an outlet that is connected to a
dedicated 20 amp house circuit breaker. A 20 amp circuit breaker inside the treadmill also
helps protects the electrical and electronic components from sustained overloads. An integral
3-prong, grounded plug meets safety requirements and protects the machine.
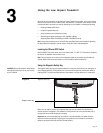
Assembly Instructions
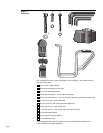
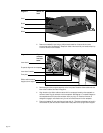
To assist you in the assembly of the treadmill, the items in the hardware kit shown in Diagram 1,
correspond to a particular letter in the alphabet. These letters appear throughout the assembly
instructions. If necessary, refer to Diagram 1 while performing the steps below.
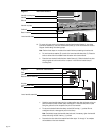
To assemble the M9.21i or M9.21si treadmill, take the following steps:
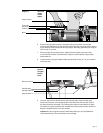
1. Locate the power switch at the front of the treadmill. Make sure that the power switch is in the
OFF (O) position and unplug the treadmill’s power cord from the power outlet. Do not
assemble the M9.21i or M9.21si treadmill if it is plugged into a power source.