


TURNING THE WALKING PLATFORM
Both sides of the walking platform are designed to be used as walking surfaces. Inspect the walking platform peri-
o
dically for wear. If there is any wood showing through the phenolic coating, or if the surface is damaged, the
walking platform should be turned over. The walking platform will need to be turned over and the walking belt re-
p
laced (see page 35) after every 16,000 to 24,000 kilometers (10,000 to 15,000 miles). Follow the instructions
below to turn over the walking platform.
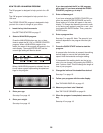
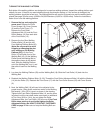
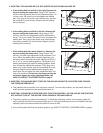
1. Remove the key and unplug the
power cord. Remove the Front
Cover Screws (16), Cover Screws
(2) and the Front Cover (17).
Remove the Front Roller
Adjustment Bolt (19) and the Front
Roller Washer (14) from each side
of the Front Roller (13 ).
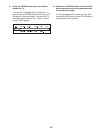
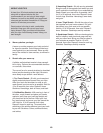
2. Remove the four Rear Walking
Platform Bolts (10) and the two
Front Walking Platform Bolts (20).
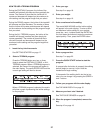
(Note: Be very careful to avoid
chipping or damaging the phe-
nolic coating on the Walking
Platform [23].) Lift the Front
Roller (13) and slide it out of the
Walking Belt (18). Lift the Walking
Platform and the Walking Belt to
the position shown by the dotted
lines. Slide the Walking Platform
out of the Walking Belt, turn it, and
then slide it back into the Walking
Belt.
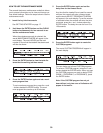
3. Lay down the Walking Platform (23) and the Walking Belt (18). Slide the Front Roller (13) back into the
Walking Belt.
4. Reattach the Walking Platform Bolts (10, 20). Thread the Front Roller Adjustment Bolts (19) with the Washers
(14) into the Roller (13). Reattach the Front Cover (17) with the Front Cover Screws (16) and Cover Screws
(2).
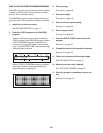
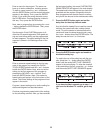
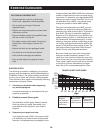
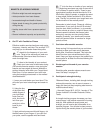
5. Next, the Walking Belt (18) will need to be adjusted to the
proper tension. Using chalk, make two marks on the Walking
Belt exactly 1.25 m (50 in.) apart, as shown in the drawing.
Tighten both Front Roller Adjustment Bolts (19, see the draw-
ing above) until the two chalk marks move apart an additional
to 5 to 6 mm (3/16 to 1/4 in). As you tighten the Roller
Adjustment Bolts, the Front Roller (13) will move. If the Front
Roller stops moving, do not further tighten the Roller
Adjustment Bolts; see HOW TO CONTACT CUSTOMER
CARE on page 2. Make sure to keep the Walking Belt cen-
tered.
34
17
16
10
16
16
14
10
19
18
23
18
2
23
20
13
20
2
50”
5
13
1–4
18