


78
speeds (2-3 mph) until you are comfortable making adjustments. Faster speeds will cause the
adjustments to take effect quicker (5-6 mph).
Example: Treadbelt tracks to the right:
a. Turn treadmill on, and bring speed up to 4.0 mph.
b. Using a 9/16" wrench, tighten the right-hand adjustment bolt 1/4" turn.
c. Loosen the left-hand adjustment bolt 1/4" turn.
d. Let Treadbelt stabilize (rotate for 30 seconds) and readjust if necessary.
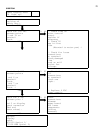
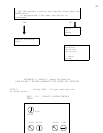
TREADBELT TENSIONING
Treadbelts are tensioned at the factory and normally need no adjustment. To determine if treadbelt
needs to be adjusted perform the following test:
1. Remove motor cover.
2. Set treadmill speed to 2mph.
3. Walk on treadbelt and see if drive roller is turning but belt is not moving. If belt is not moving then
tension treadbelt ONLY until belt ceases to slip.
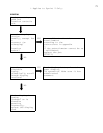
The same adjustment bolts used for tracking TENSION the Treadbelt. To tighten Treadbelt, turn both
adjustment bolts (clockwise) exactly the same amount. Failure to turn them equally will affect belt
tracking. You are moving the rear roller closer or further away from the deck to tension the Treadbelt.
DO NOT OVER TIGHTEN TREADBELT / DRIVE BELT! If you can't reach the palm of your hand
under the center of the Treadbelt, if the edges of the belt are curled up, or if you hear the belt
“groaning” THE TREADBELT IS TOO TIGHT.
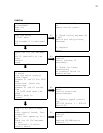
*If normal tracking procedures are not working satisfactorily, proceed with the following
MAKE SURE TREADMILL IS LEVEL!
Make sure the treadmill is completely level. Place a carpenter's level across rear frame rails
running parallel with rear roller. VERY IMPORTANT: Must have a minimum of 150 pounds on the
treadmill’s side steps for the reading to be accurate. First try to move treadmil to more level
flooring. If that is not an option use leveling shims. You either put something under the rear feet
or install shims between the rear foot and the frame. Simply loosen the two Philips head screws
and slide shim in place. Tighten screw and re-check that the treadmill is level.
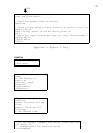
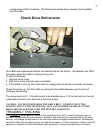
DRIVE ROLLER ALIGNMENT:
The Drive Roller is preset at the factory. However, if the Treadbelt is centered at the Rear Roller
but is off center in the front, an adjustment will need to be made. The Drive Roller is secured to
the frame with two hex head bolts. (3/8 wrench) The holes in the frame are elongated; this allows
for forward and aft adjustment of the drive roller.
Example:
Treadbelt is tracking to the right hand side. Adjust right hand side of drive roller by moving it
towards the front (motor side) of treadmill. The Treadbelt will move towards the center.
Recommended Maintenance
Home Models
-
Vacuum around and underneath the treadmill on a monthly basis. Vacuum or wipe
down the deck area between the treadbelt and frame. Wipe down display and handrails after every
use. No other maintenance is required.