


42
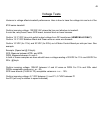
ELEVATION MOTOR
1. Remove Elevation Motor.
A. Remove all weight from the elevation assembly by placing a suitably strong object under the
under motor pan (toolbox) so that the wheels are in the air.
B. Disconnect elevation motor harness from lower board or lower harness.
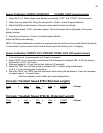
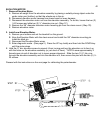
C. Disconnect the elevation motor nut from the elevation assembly. To do this, loosen the two (2)
¼-20 screws and slide two (2) ¼” diameter pins out. (Step 1C)
D. Remove the 3/8” diameter elevation motor mounting pin from the clevis mount. (Step 1D)
E. Remove elevation motor.
2. Install new Elevation Motor.
A. Remove your toolbox and set the treadmill on the ground.
B. Align the Elevation Motor with the clevis mount and install the 3/8” diameter mounting pin.
Insert the hitch pin.
C. Reconnect the Elevation Motor wires.
D. Enter diagnostic mode. (See page 2.) Press the UP key briefly and then hold the DOWN key
until the motor stops.
E. Hold the ¾” dia. elevation screw to prevent it from turning and turn the elevation nut to line it up
with the holes on the elevation assembly (or just short of them). * NOTE-Leave approximately 2
threads open at end of elevation nut to insure proper alignment. Slide the two (2) ¼” dia. pins
through the elevation assembly and into the elevation nut, then secure the pins with the two (2) ¼-
20 screws.
Proceed with the instructions on the next page for calibrating the potentiometer.