


44
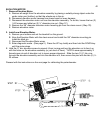
ELEVATION LEG ASSEMBLY
1. Remove plastic motor cover.
2. Remove set screws (2) holding elevation motor to elevation leg assembly.
3. Remove elevation pins from elevation gear nut.
4. Carefully turn treadmill onto its side to gain access to elevation leg mounting brackets.
5. Remove screws from mounting brackets (2 on each side) and remove leg assembly.
Note: On re-assembly be sure to lubricate brackets with grease.
6. Reverse to install.
TREADBELT
UNPLUG TREADMILL!
1. Remove rear roller. (9/16" hex head bolts located rear of treadmill.)
2. Remove drive-belt. Loosen motor tensioning hook, pivot motor forward and remove belt.
3. Remove drive roller. Two Philips or Two 3/8" hex head bolts on right and left side.
*Not necessary to reinstall (two) inboard star washers for right and left sides.
4. Remove two traction strips located on topside of frame rails (Pull up by hand).
5. Remove four Phillips head screws on right and left sides, lift off side frame covers.
6. Lift off slider deck (Flip or replaced if needed).
7. Remove treadbelt.
8. Reverse steps for install.
DECK REMOVAL/DECK REVERSAL
UN PLUG TREADMILL
1. Loosen take up screws on rear roller removing all tension on treadbelt.
2. Remove one handrail (either side).
3. Remove traction strip on top of both side frame rails. This is the black plastic strip you stand on
before stepping onto the treadbelt. Pull up to remove.
4. Remove eight Philips head screws and lift off side frame covers.
5. Lift deck up and slide out.
6. Reverse steps for install.
Take Up Roller/ Rear Roller
UN PLUG TREADMILL
1. Release all tension on treadbelt (walking belt). Rotate (counterclockwise) two 9/16" take up bolts
located on rear roller, remove completely.
2. Remove drive-belt.
3. Remove drive roller.
4. Remove two rear end caps.
5. Slide rear roller out from back.
6. Reverse steps for install.