


8
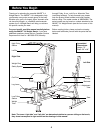
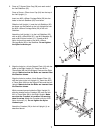
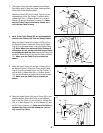
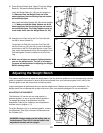
4. Snap a Carriage Bushing (56) into the Weight Stop
(53). Slide both parts onto the Rear Upright (9), mak-
ing sure that the Carriage Bushing (56) is on top.
Attach the parts to the indicated hole in the Rear
Upright with an M8 x 68mm Bolt (60) and an M8
Nylon Locknut (13).
Next, slide the Rear Upright (9) onto the Right
Stabilizer (26). Make sure that the Rear Upright is
turned so the upper end slants in the direction
shown. Attach the Rear Upright with an M10 x 65mm
Bolt (67), two M10 Washers (6), and an M10 Nylon
Locknut (11). Do not tighten the Nylon Locknut yet.
4
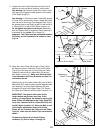
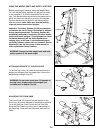
6. Press a 2Ó Square Inner Cap (17) into the open end
of the Top Frame (7).
Place the Top Frame (7) onto the Right Upright (2)
and the Rear Upright (9).
Attach the Top Frame (7) to the Right Upright (2) with
an M10 x 65mm Bolt (67), two M10 Washers (6) and
an M10 Nylon Locknut (11). Attach the Top Frame to
the Rear Upright (9) in the same manner.
6
67
60
6
56
53
6
hole
13
11
26
67
6
67
2
9
11
11
6
7
17
6
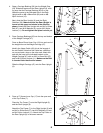
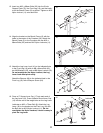
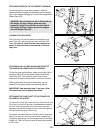
5. Press Carriage Bushings (56) into the top and bottom
of the Weight Carriage (47).
Press a 48mm Round Inner Cap (12) into each end of
the weight tube on the Weight Carriage (47).
Identify the Upper Cable (45); this is the longest of
the two Cables. Note that the Cable has a ball/loop
on one end and a loop on the other end. Attach the
end with the loop to the indicated bracket on the
Weight Carriage (47) with an M10 x 19mm Bolt (57)
and an M10 Nylon Locknut (11). Make sure the Bolt
is inserted from the direction shown.
Slide the Weight Carriage (47) onto the Rear Upright
(9).
5
56
45
12
57
47
12
9
56
11
9
9
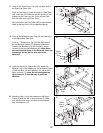
Low
Side
High
Side