


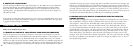

Once zoomed in on a picture, you are also able to navigate around the picture by pressing the display
button. A yellow 4-way symbol appears in the corner of the LCD next to the magnification number,
you then use the 4-way switch to move up, down, left or right as desired.
To see thumbnails of multiple pictures stored in the memory while in Review mode, push the “Display”
Button. You may see up to 9 pictures at a time. You move through the thumbnails by using the Up,
Down, Left and Right arrows on the 4-way switch. Press “Display” again to see a selected (highlighted)
thumbnail as a full frame photo.
To exit from the Review mode, again press the “View” button. You are then back in Capture mode.
DELETING/PROTECTING PHOTOS AND FORMATTING A NEW SD CARD:
With the camera in the Review mode (press the View button if necessary), press the “MENU” button in
the middle of the 5-way switch. This opens the menu that will allow you to perform the following actions:
(use the 5-way switch and menu button as previously instructed to make choices from this menu, select or
change settings, and return to the main menu)
DELETE: Erases photos from the internal memory, or from the SD card if you have inserted one before
beginning
to shoot photos. You may choose:
• One: deletes the currently displayed photo only-after pressing MENU to delete a photo, use the
left/right arrow key to display the next photo you want to delete and repeat the process
• All: deletes all photos held in the internal memory or SD card
• Cancel: select if you decide not to delete a photo after entering this menu
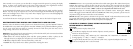
FORMAT: Formats a new or previously used SD card to enable storing photo files. Select OK and press
MENU after inserting a card for the first time. Be sure the card has been inserted with the notched
corner on the left as indicated below the card slot. Note that formatting a card will erase any photos
previously stored on the card. Note: “MMC” cards are not compatible and should not be used.
PROTECT: Protects the currently displayed photo from accidental erasure. Pressing the MENU
button will toggle between PROTECTED and UNPROTECTED. Once protected, a photo must be
unprotected using this menu item before it can be deleted.
SETUP: Provides same options as SETUP in the previous “Record” mode menu-those items can also
be
accessed while in Review mode to change time/date stamp, beep on/off, etc.
EXIT: Returns to the regular Review mode (stored photos are displayed).
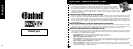
LCD DISPLAY SYMBOLS (ICONS VISIBLE IN CAPTURE OR
REVIEW MODE AS INDICATED)
CAPTURE
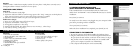
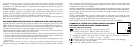
1) B
attery Meter: Displays battery level
2)
Total Photos: Displays the total number of photos currently stored in
internal or SD card memory.
3) R
esolution Setting: “3M”: 2048×1536, “H”: 1600×1200, “M”: 1280×1024, “L”: 800×600
4) I
mage Quality: *** “Best,” ** “Better,” * “Standard
5) Captur
e Mode: Normal (no icon), self timer (clock icon), sequential (multiple frame icon).
6) SD
card: Displayed when a card is inserted.
Full
Low
Dead
ON
Full
Low
D
ead
022
022
3M
H
M
L
3M
H
M
L
*
**
***
*
**
***
Full
Low
Dead
ON
Full
Low
D
ead
022
022
3M
H
M
L
3M
H
M
L
*
**
***
*
**
***
Full
Low
Dead
ON
Full
Low
D
ead
022
022
3M
H
M
L
3M
H
M
L
*
**
***
*
**
***
Full
Low
Dead
ON
Full
Low
D
ead
022
022
3M
H
M
L
3M
H
M
L
*
**
***
*
**
***
Full
Low
Dead
ON
Full
Low
D
ead
022
022
3M
H
M
L
3M
H
M
L
*
**
***
*
**
***
Full
Low
Dead
ON
Full
Low
D
ead
022
022
3M
H
M
L
3M
H
M
L
*
**
***
*
**
***
Full
Low
Dead
ON
Full
Low
D
ead
022
022
3M
H
M
L
3M
H
M
L
*
**
***
*
**
***
Full
Low
Dead
ON
Full
Low
D
ead
022
022
3M
H
M
L
3M
H
M
L
*
**
***
*
**
***
6 7