


5. IMAGE QUALITY affects overall photo quality and maximum # of photos that can be stored in the
internal memory, by changing the amount of file compression. The actual photo capacity you get will
vary with the content of the photos.
• Settings: “Best” is highest quality (least compression), and lets you store up to 22 photos in the
internal
memory, “Better” will store up to 41 photos, and “Standard” allows a maximum capacity
of about 113 photos. You can expand memory capacity with an SD card to enable storing more
photos at higher quality settings.
6. S
ETUP controls miscellaneous settings such as time/date stamp, auto off time, etc. Use the 4-way arrow and
menu buttons to navigate through, select, and change these settings as instructed previously under
“Changing camera settings”. The setup submenu and selections includes:
1. LANGUAGE: (M
enu Screens): English, French, Spanish, Italian, German, Chinese
2. AUTO OFF: Disable, 1 minute, 2 minutes, or 3 minutes
3. CLOCK SET: To change the date & time (after pressing “MENU” to access), select “SET”
(pr
ess MENU, then left arrow), then use the left/right arrow keys to step through the date/
time segments and use the up/down arrow keys to change the settings. When all settings are
complete, press MENU twice to confirm and exit the clock setting.
4. SOUND: Turns confirmation/warning beeps On or Off
5. DATE STAMP: Off, YY/MM/DD (Year/Month/Day is imprinted on photos), MM/DD/TT
(M
onth/Day/Time imprinted)
6. EXIT: Exits SETUP submenu and returns to the main setting menu.
7.
EXIT returns you to the Capture mode, ready to take a new photo.
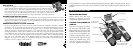
TO USE SPECIAL CAPTURE MODES
With the camera on and displaying the “live” image (ready to take a new photo), press the right side of
the silver 5-way button to use these features, indicated by an icon (symbol) in the upper right corner
of the display:
Self Timer:
(clock icon) Provides 10 second delay before the photo is taken after
SNAP is pressed. Useful for reducing vibration or shake that may occur from
pushing the SNAP button when camera is tripod mounted. You may also use the
supplied remote shutter button to avoid jarring the camera. It plugs in next tot
the USB port and does not require using the self timer (no delay).
Sequential Shooting: (multiple frames icon) Take a series of 3 photos at
1-second intervals. Great for sports or action shots.
Normal: (no icon in upper right corner) One photo at a time is taken, with no delay.
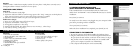
REVIEWING PHOTOS STORED IN MEMORY
Press the “View” button (turn on the display first if needed). This will change the camera to the
Review mode. The default is viewing one frame at a time (full screen), beginning with the last (most
recent) photo taken. You may now step through the pictures in the memory by using the “Left” and
“Right” arrow buttons on the silver 5 way switch under the LCD. The numbers at the top left show
the number of the current photo / number of total photos stored. The resolution setting used for each
photo is also seen.
You can zoom in and out on a picture as you review it by using the “Up and Down” arrow buttons on
the 5-way switch. This allows you to zoom in by up to 4x magnification to check sharpness or details
in your photo. The additional amount of magnification is shown under the photo number on the left
upper corner of the LCD.
4 5