


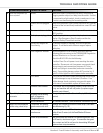
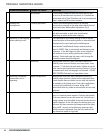


CONDITION/PROBLEM THINGS TO CHECK SOLUTION
HR receiver. If chest strap is known to work with other devices and
no sources of interference are present, or if console has
been tested with a Pulse Simulator and is not receiving the
signal, replace the HR receiver and wire.
4
Walking belt
misalignment.
Tracking adjustmen If either of the walking belts seem to be tracking
excessively to one side or the other adjust belt at front of
each treadle (see Walking Belt Adjustment, Pg. 9)
Roller shaft bracket If belt adjustments don't correct misalignment replace
both belts and either or both roller shaft bracket
depending on which belt(s) aren't aligning.
5
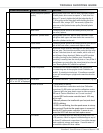
Hesitation or belt slipping
when walking on unit.
Belt tension If belt hesitates or slips when walking on unit it may be
caused by either a loose walking belt or a loose drive belt.
To determine the cause perform the following test:
Stand beside TreadClimber® fitness machine and set
speed to 2 MPH. Step on one treadle and attempt to stop
movement. If one belt stops but roller at rear and other
belt continues to turn, walking belt tension should be
adjusted. If both belts stop but motor is still turning the
drive belt tension should be adjusted.
Drive belt. Unplug power from unit. Wait 5-minutes to ensure no
residual power remains. Remove rear base plastic cover
to expose “v” belt drive line and motor. Tighten nut on the
motor tension bolt located on front side of motor in 1/2 turn
increments until drive belt slippage is eliminated - DO NOT
OVER TIGHTEN. Reinstall rear base plastic cover
6
Knocking / squeaking
noises when unit is
operating.
Upper linkage bolts. Unplug power from Unit. Wait 5-minutes to ensure no
residual power remains. Located on the underneath side
of each treadle there are bolts, one per side, that connect
the treadles to the linkage arms. Push right treadle down
to access left treadle and vice versa. Using a 9/16”
wrench and Allen key, make sure these bolts are securely
tightened.
Lower linkage bolts. Unplug power cord from rear of unit. Wait 5-minutes to
ensure no residual power remains. Push the right treadle
all the way down to access left teeter bolt. You will see a
linkage system near the middle of the unit that ties the two
treadles together. On the left side of the linkage pivot, you
will see a bolt that connects the linkage arms to the pivot.
Using a 9/16” wrench and an Allen key, make sure that
bolts are securely tightened. Push the left treadle all the
way down and repeat for right side
TROUBLE SHOOTING GUIDE
62
REPAIRS/MAINTANENCE