


5
“ASSEMBLY INST RUCTIONS”
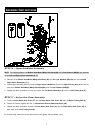
Place all parts from the box in a cleared area and position them on the floor in front of you. Remove all packing materials
from your area and place them back into the box. Read each step carefully before beginning.
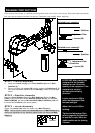
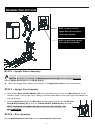
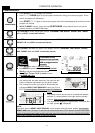
STEP 1 –
Leveler Assembly
a. Attach the Leveler x 4 (58) to the Front Stabilizer (2) and the Rear
Stabilizer (3).
b. Be sure to tighten the Leveler (58) securely against the Stabilizers (2, 3)
until screw completely tightened as the drawing 1 shown on the top right
corner.
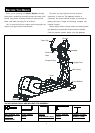
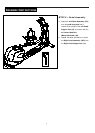
STEP 2 – Stabilizer Assembly
Attach the Front Stabilizer (2) and the Rear Stabilizer (3) onto the Main
Frame (1) and secure with the 4 x Washers (8x38x2.0t) (70), the 4 x Lock
Washers (M8)(66) and the 4 x Hex Head Bolts (M8xp1.25x65mm) (94) with
the socket wrench(13mm) (See picture above)
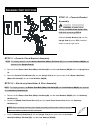
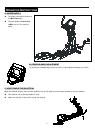
STEP 3 – Leveler Assembly
Tighten one Leveler (58) under the middle of the Main Frame (1).
NOTE: It will be easier to attach the Leveler (58) under the Main Frame (1) by
placing one Styrofoam (or any stationary object) under one side of the Main
Frame (1).
Detailed Lever- drawing 1
Detailed Lever- drawing 2
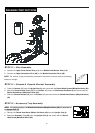
LEVELING: After placing the
equipment in the intended
location for use, Check the
stability of the equipment. If the
equipment is not level,
reviewing the following
direction:
Loosen the Leveler (58) to
make the Adjustment Plate
become less tight.
Adjust the Leveler (58) for
leveling.
Tighten the Adjustment Plate
securely against the Stabilizer
to lock the Leveler (58) in the
stable position as the drawing
2 shown.
Stabilizer
Adjustment Plate
Leveler (58)
Adjustment Plate
Stabilizer
Leveler (58)
Screw line