


-20-
M1036 Micro Mill
OPERATIONS
Collets
The collet chuck (an optional accessory) for the micro
mill offers increased precision and rigidity compared to
the drill chuck. Each collet will only fit tooling with a
specific shaft diameter. This collet set includes
1
⁄4",
3
⁄16",
5
⁄32",
5
⁄64",
3
⁄64" collets.
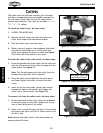
To install the collet chuck, do these steps:
1. UNPLUG THE MICRO MILL!
2. Remove the drill chuck and clean the arbor and
collet chuck tapers with denatured alcohol.
3. Push the collet chuck onto the arbor.
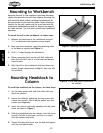
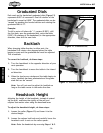
4. Place a piece of wood on the compound slide table
and use the downfeed lever to firmly press the
collet chuck against the piece of wood (see
Figure
23) to seat the collet chuck on the arbor.
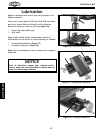
To install the collet in the collet chuck, do these steps:
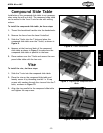
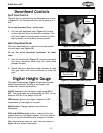
1. Place the grooved end of the collet into the collet nut
until the off-center lip of the collet nut snaps into the
collet groove. See Figure 24.
Note: This lip and groove pulls the collet from the
spindle when the collet nut is removed.
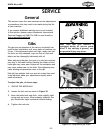
2. Place the collet nut and collet into the collet chuck
and finger tighten the collet nut onto the collet
chuck.
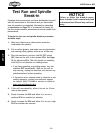
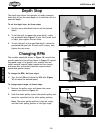
3. Insert the bit into the collet, place a hex wrench
through the hole in the spindle, and tighten the
collet with a 22mm wrench (see
Figure 25).
To remove a bit from the collet chuck, do these steps:
1. Protect the table surface with a piece of cardboard
or hold the cutter or tool with a shop towel to pre
-
vent it from falling out of the collet.
2. Place a hex wrench through the hole in the spindle
and loosen the collet nut with a 22mm wrench until
the bit is free.
Note: Remove the collet chuck in the same manner as
removing the drill chuck.
Figure 23. Installing the collet chuck.
Figure 24. Collet and collet nut lip.
Off-Center Collet Lip
and Collet Groove
Figure 25. Installing a collet.