


13
To enter the Clock's configuration, press and hold down the PAUSE key and press the CLEAR key
twice. Continue to hold down the PAUSE key until the MESSAGE CENTER displays the words "SER-
VICE MENU". Then, release the PAUSE key and press the QUICK START key. The MESSAGE
CENTER then displays "MANAGER CONFIG". Press the TIME down arrow key once - message
center displays "CLOCK CONFIGURATION". Press the Enter key to access the CLOCK CONFIG
MENU.
Use arrow keys to select an item you want to change. You can select the following:
• Set Day
• Set Date
• Set Time
Press ENTER on the item you want to change. Use the arrow keys to change the item and then
press ENTER. Your changes will be saved and then you will see "CLOCK SET TO LOCAL" in the
display. Once you see this message you can press the CLEAR key 3 times to exit the Clock configu-
ration mode.
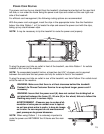
CENTERING THE BELT
After installing and levelling the treadmill, check the belt to ensure that it is tracking properly. First,
plug the power cord into an appropriate outlet. See Electrical Requirements at the beginning of this
section for details. Then, turn the treadmill ON.
Have one person stand on the platforms on either side of the treadmill belt. Do not stand on the belt
at this time. Press the QUICK START key, and increase the speed to 4.0 miles per hour (MPH), or
6.4 kilometers per hour (KPH), using the SPEED UP arrow.
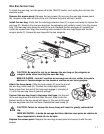
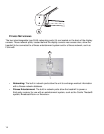
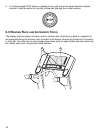
If the striding belt moves to the right while it is running, have a second person turn the right tension
bolt a quarter-turn clockwise, and then turn the left tension bolt (A) a quarter-turn counter-clockwise.
See the illustration below. This action sets the striding belt tracking back to center of the roller.
If the striding belt moves to the left, turn the left tension bolt a quarter-turn clockwise and then turn
the right tension bolt a quarter-turn counter-clockwise to start the striding belt tracking back to center
of roller.
Repeat these adjustments until striding belt appears centered. Allow the belt to continue running for
several minutes to be sure that the tracking is stabilized.
NOTE: Do not exceed one full turn of the adjusting screws in either direction. If, after one full turn,
the belt does not track properly, contact Customer Support Services. The phone numbers are listed in
Section 6.7, titled How to Obtain Product Service.