


3
TABLE OF
CONTENTS
Section Description Page
1. Getting Started . . . . . . . . . . . . . . . . . . . . . . . . . . . . . . . . . . . . . . . . . . . . . . . . .6
1.1 Important Safety Instructions . . . . . . . . . . . . . . . . . . . . . . . . . . . . . . . . . . . . . . .6
1.2 Setup . . . . . . . . . . . . . . . . . . . . . . . . . . . . . . . . . . . . . . . . . . . . . . . . . . . . . . . .10
Electrical Power Requirements
Grounding Instructions
Wax bag Instructions
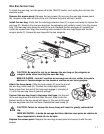
How to Position and Stabilize the Treadmill
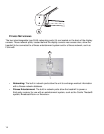
Power Switch
Setting the Clock
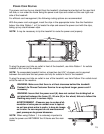
Centering the Belt
Fitness Networking
Power Cord Routing
2. The Display Console . . . . . . . . . . . . . . . . . . . . . . . . . . . . . . . . . . . . . . . . . . . .16
2.1 Display Console Overview . . . . . . . . . . . . . . . . . . . . . . . . . . . . . . . . . . . . . . . .16
2.2 Display Console Descriptions . . . . . . . . . . . . . . . . . . . . . . . . . . . . . . . . . . . . . .17
2.3 Reading Rack and Accessory Trays . . . . . . . . . . . . . . . . . . . . . . . . . . . . . . . . .18
3. Heart Rate Zone Training® Exercise . . . . . . . . . . . . . . . . . . . . . . . . . . . . . . . . .19
3.1 Why Heart Rate Zone Training® Exercise . . . . . . . . . . . . . . . . . . . . . . . . . . . . .19
3.2 Heart Rate Monitoring . . . . . . . . . . . . . . . . . . . . . . . . . . . . . . . . . . . . . . . . . . .20
The Optional Heart Rate Chest Strap
4. The Workouts . . . . . . . . . . . . . . . . . . . . . . . . . . . . . . . . . . . . . . . . . . . . . . . . . .21
4.1 Workout Overviews . . . . . . . . . . . . . . . . . . . . . . . . . . . . . . . . . . . . . . . . . . . . .21
4.2 Using the Workouts . . . . . . . . . . . . . . . . . . . . . . . . . . . . . . . . . . . . . . . . . . . . .21
4.3 Workout Descriptions . . . . . . . . . . . . . . . . . . . . . . . . . . . . . . . . . . . . . . . . . . . .22
Quick Start
Manual
Hill
Random
Fit Test
Fat Burn
Cardio
4.4 Maximizing Workouts on a Life Fitness Treadmill . . . . . . . . . . . . . . . . . . . . . . .28
Selecting an Intensity Level
Using InstaPace
TM
Feedback
Using ZerOut
TM
Speed Control
Cool-Down
4.5 Logging On to the Network . . . . . . . . . . . . . . . . . . . . . . . . . . . . . . . . . . . . . . . .29
5. The Manager’s Configuration . . . . . . . . . . . . . . . . . . . . . . . . . . . . . . . . . . . . . .30
5.1 Entering and Using the Manager's Configuration . . . . . . . . . . . . . . . . . . . . . . .30
5.2 Configuration Settings . . . . . . . . . . . . . . . . . . . . . . . . . . . . . . . . . . . . . . . . . . .31
Using the Start Message Setup
Using the MaxTime
TM
Setup
Using the Standby Setup