


BEFORE
YOU BEGIN
20
INTRODUCTION
IMPORTANT
PRECAUTIONS
ASSEMBLY
BEFORE
YOU BEGIN
ELLIPTICAL
OPERATION
LIMITED
WARRANTY
TROUBLESHOOTING
& MAINTENANCE
CONDITIONING
GUIDELINES
ASSEMBLY
ELLIPTICAL
OPERATION
BEFORE
YOU BEGIN
ASSEMBLY
21
INTRODUCTION
IMPORTANT
PRECAUTIONS
ELLIPTICAL
OPERATION
CONDITIONING
GUIDELINES
TROUBLESHOOTING
& MAINTENANCE
LIMITED
WARRANTY
ELLIPTICAL
OPERATION
ASSEMBLY
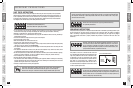
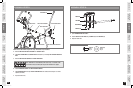
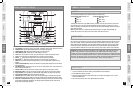
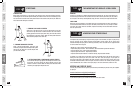
Note: There is a thin protective sheet of clear plastic on the overlay of the console that should be removed.
LED WINDOWS: Time, Distance, Calories, Heart Rate, % Complete, Speed, Incline, Resistance and Scan.
FEEDBACK LEDS: Indicate what workout feedback is currently being displayed.
TRAINING MODE LEDS: Indicate what training mode is currently selected.
SAVED WORKOUT LEDS: Indicate when a saved workout is selected.
START: Press start to begin exercising, starts your workout, or resume exercising after pause.
STOP: Press to pause/end your workout. Hold for 3 seconds to reset the elliptical.
INCLINE / KEYS: Used to adjust incline in small increments (10% increments).
RESISTANCE + / - KEYS: Used to adjust resistance in small increments (increments of 1).
ENTER: Used to confirm selection and adjust settings. Press to change display feedback during
workout.
SELECT TRAINING MODE KEY: Used to select between 3 training modes: Weight Loss, Event Training
and Cardio Training.
SAVE WORKOUT KEY: Used to select and use any of 4 pre-saved workouts. After your workout, press
to save a workout for future use.
INCLINE MYKEYS
™
: Used to reach desired resistance more quickly. See next page for details.
RESISTANCE MYKEYS
™
: Used to reach desired resistance more quickly. See next page for details.
IPOD
®
CONTROLS: Press to adjust your attached iPod
®
audio settings. See page 24 for more info.
IPOD
®
DOCKING STATION: Used to dock and charge your iPod
®
.
SPEAKERS: Music plays through speakers when your CD / MP3 player is connected to the console.
AUDIO IN JACK: Plug your CD / MP3 player into the console using the included audio adaptor cable.
AUDIO OUT / HEADPHONE JACK: Plug your headphones into this jack to listen to your music through
the headphones. NOTE: When headphones are plugged into the headphone jack the sound will no
longer come out through the speakers.
A
B
C
D
E
F
G
H
I
J
K
L
M
N
O
P
Q
R
E 1 20 1 C O N SO L E D IS P L AY
RE SISTAN CEINC LINE
M y K E Y S
™
M y K E Y S
™
EASY
MED
HARD
LOW
HIGH
MED
SAVE
WORKOUT
SELECT
TRAINING
MODE
CHANGE
DISPLAY
ENTER
STAR T
Q U I CK S T AR T
STO P
H O L D T O R ES E T
EVENT
TRAINING
CARDIO
TRAINING
WEIGHT
LOSS
SAVED
WORKOUT
SAVED
WORKOUT
SAVED
WORKOUT
SAVED
WORKOUT
CALORIES HEART RATE
SCAN
% COMPLETE SPEED
INCLINE RESISTANCE
TIME DISTANCE
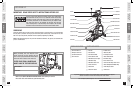
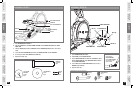
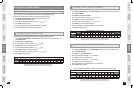
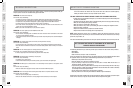
Press and hold a
MyKEY
™
for three
seconds to set key
to current incline.
Press and hold a
MyKEY
™
for three
seconds to set key
to current resistance.
A
B
C
D
E
F
K
N
M
P
G
I
J
L
O
R
Q
H
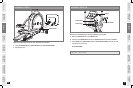
Press and hold a
MyKEY
™
for five
seconds to set key
to current incline.
Press and hold a
MyKEY
™
for five
seconds to set key
to current resistance.
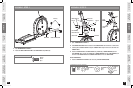
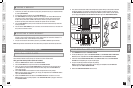
CO N S O L E OP E R AT I ON
Use this mode if you wish to begin working out immediately.
Turn on the elliptical (the switch is located at the bottom-front of the elliptical).
Press START key and begin exercising.
Workout will automatically count time up from 0:00, the resistance will default to Level 1, and the
incline will default to 0%.
The incline and resistance level can be adjusted during the workout.
1
2
3
4
Q U I C K S TA RT
You can program the MyKeys to your desired resistance or incline values.
M y K E YS
™
The INCLINE MYKEYS defaults are:
Low = 0%
Med = 30%
High = 70%
The RESISTANCE MYKEYS defaults are:
Easy = 1
Med = 8
Hard = 12
To change the default value of any MyKEY, while in a workout, first select the resistance or incline level
you would like to save, then press and hold the MyKEY you wish to change for 3 seconds. The current
incline or resistance level will flash on the console and beep three times indicating that the new level has
been saved successfully.
NOTE: Easy/Low cannot be set higher than Med and Med cannot be set higher than Hard/High. The
console will beep once if the values are incorrect and the value will not be saved.
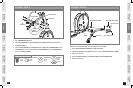
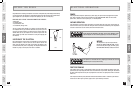
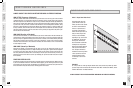
IMPORTANT: The heart rate function on this product is not a medical device. While heart rate grips can
provide a relative estimation of your actual heart rate, they should not be relied on when accurate
readings are necessary. Some people, including those in a cardiac rehab program, may benefit from using
an alternate heart rate monitoring system like a chest or wrist strap. Various factors, including movement
of the user, may affect the accuracy of your heart rate reading. The heart rate reading is intended only as
an exercise aid in determining heart rate trends in general. Please consult your physician.
PULSE GRIPS
Place the palm of your hands directly on the grip pulse handlebars. Both hands must grip the bars for your
heart rate to register. It takes 5 consecutive heart beats (15-20 seconds) for your heart rate to register.
When gripping the pulse handlebars, do not grip tightly. Holding the grips tightly may elevate your blood
pressure. Keep a loose, cupping hold. You may experience an erratic readout if consistently holding the
grip pulse handlebars. Make sure to clean the pulse sensors to ensure proper contact can be maintained.
H E A RT RAT E
E1201_Rev.1.4.indd 20-21 7/29/08 10:37:51 AM