


CC-TR100
3534
CC-TR100
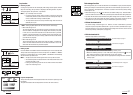
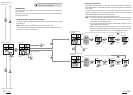
Defining remote button
menu screen
MODE-
1
MODE-
2
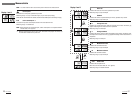
Heart rate zone menu screen
MODE-
1
MODE-
2
Lower limit
Upper limit
S/S/E
+
MODE-
1 + 2
MODE-
1
MODE-
1
MODE-
1
MODE-
2
MODE-
1
MODE-
1
MODE-
1
MODE-
1
MODE-
2
MODE-
2
MODE-
2
MODE-
2
MODE-
2
MODE-
2
MODE-
2
S/S/E
+
MODE-
1 + 2
S/S/E
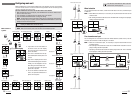
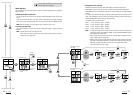
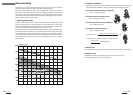
• Changing the cadence zone
When MODE-1 button is pressed, the lower limit and upper limit flash in alternating order.
When MODE-2 button is pressed while lower limit or upper limit is flashing, the first digit will
begin to flash.
To change a value and shift the digit, see the illustrations below. After entering the desired
value, press the MODE-1 button to cause all the numeric characters to flash, and press the
START/STOP/ENTER button to finish the setting operation.
In the initial setup, the lower limit is set at 80 and the upper at 120.
NOTE: • To change the upper/lower limits, the computer must be reset while the bicycle is
not in motion. Press the MODE-1, MODE-2, and START/STOP/ENTER buttons si-
multaneously to reset all measurements.
• Not resetting all measured data causes the “PLEASE rESEt” message to be dis-
played, making selection impossible.
• When a lower limit value greater than the upper limit value is entered, the upper
limit value is automatically adjusted to the value of the lower limit value plus one.
When a wrong upper limit value is entered, the same adjustment is made.
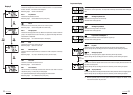
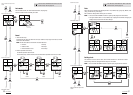
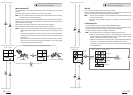
First digit
First digit
Digit shift
Third digit
Second digit
Second digit
Digit shift
Changing the lower
limit value
Changing the upper
limit value
Reset all
measurements.
Select
Digit shift
Digit shift
Third digit
Reset all
measurements.
For the basic information on how to use the
menu screen, refer to page 28.
MODE-
1
MODE-
1
S/S/E
S/S/E
On
OFF
MODE-
2
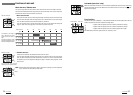
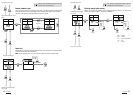
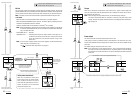
Cadence zone
You can check your time in cadence zone, turn the cadence zone on/off, and change the ca-
dence zone range.
On the menu screen, Display 3 indicates the lower limit of the zone range while Display 4
indicates the upper limit.
• Checking the time in target zone and set target
Pressing the START/STOP/ENTER button displays the time in the cadence zone in the upper
line of Display-5.
NOTE: Resetting the main measurement returns the time in zone to zero.
The target setting status is displayed at the bottom of the display with either “on” or “off”.
The target is set at OFF in the initial setup.
Target setting status
(on/off)
Set target
Cadence zone menu screen
Select
Time in cadence zone