


S3.19 Assembly and Maintenance Guide
page 27
1 2 3 4 5 6
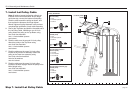
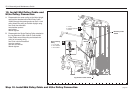
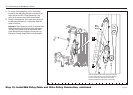
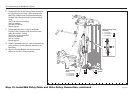
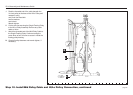
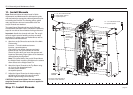
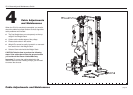
11. Install Shrouds
Note: Read and follow the steps found in Cable
Adjustments and Maintenance to lubricate the guide
rods and make the appropriate cable adjustments prior
to installing the Shrouds. The floating pulleys, guide
rods, and selector stem are inaccessible once the
acrylic Shrouds are attached.
Two metal Upper Shrouds and two acrylic Shrouds
are attached to the Main Frame. Complete the assembly
steps for one side of the unit before moving to the other.
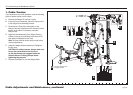
Important: Handle the shrouds with care. The acrylic
shrouds require special handling as they are easily
scratched. For proper care and maintenance, refer to
Adjustments and Maintenance.
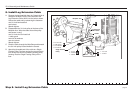
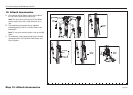
A. Attach an acrylic Shroud to each side of the Main
Frame using
fourteen - 1¾-inch buttonhead screws
fourteen - tapered spacers
Start with the two bottom fasteners and work
toward the top. Ask your assistant to hold the
Shroud in place while you insert the spacers and
fasteners. Alternately finger tighten all six fasteners
while adjusting the alignment.
Note: The frosted side of the acrylic Shroud faces
the Weight Stack. Install the Shrouds so the cutouts
allow access to the Weight Stack Pin.
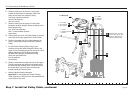
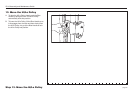
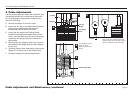
B. Attach the Upper Shrouds to the Top Beam using
six 1¾-inch zinc buttonhead bolts
six black plastic washers
six tapered spacers
C. Adjust the Upper Shroud so its bottom edge is
parallel to the top edge of the acrylic shroud.
Wrench tighten using a 5mm hex key.
CAUTION: Do not over tighten. You can crack or
warp the Shroud if too much pressure is applied to
the fasteners.
B
6 - 1¾" zinc buttonhead bolts
6 - black plastic washers
6 - tapered spacers
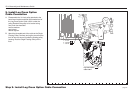
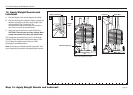
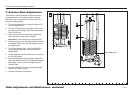
Step 11. Install Shrouds
Shroud
(frosted side
faces weight
stack)
Cutout in
Shroud
A
14 - 1¾" buttonhead screws
14- tapered spacers
Shroud
(frosted side
faces weight
stack)
The Hi/Lo Pulley Assembly is
not shown in this illustration.