


S3.19 Assembly and Maintenance Guide
page 19
1 2 3 4 5 6
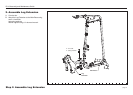
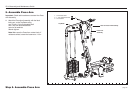
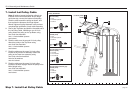
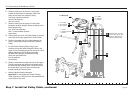
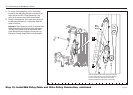
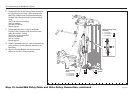
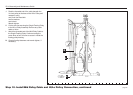
Step 7. Install Lat Pulley Cable
7. Install Lat Pulley Cable
Note: All pulleys (except the floating pulleys) are
installed in the frame assemblies. As you begin
each new step, remove the fasteners and pulley.
Feed the cable around the pulley as shown, and
then replace the fasteners and finger tighten.
Wrench tighten all pulley fasteners once you have
completed the installation of each cable assembly.
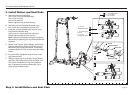
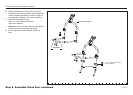
A. Start at the Top Beam and feed the threaded end of
the Lat Pulley Cable 130208 over one 4½-inch
pulley. Attach the pulley to the Top Beam using
one 4-inch hex head bolt
two 1¼-inch shoulder spacers
one locknut
B. Feed the cable over the second 4½-inch pulley.
Attach the pulley to the Top Beam using
one 4-inch hex head bolt
two 1¼-inch shoulder spacers
one locknut
C. Feed the cable over the upper 3½-inch pulley
located in the Press Arm assembly. Attach the
pulley to the Press Arm assembly using
one 2-inch zinc hex head bolt
two zinc flat washers
one zinc locknut
D. Feed the cable over the upper 3½-inch pulley
located in the Main Upright. Attach the pulley to the
Main Upright using
one 4-inch hex head bolt
two 1¹⁄₄-inch shoulder spacers
one locknut
A
B
C
D
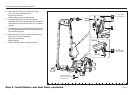
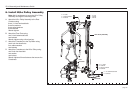
4½-inch Pulley
1 - bolt
2 - shoulder spacers
1 - locknut
3½-inch Pulley (used on gray
painted parts)
1 - bolt
2 - shoulder spacers
1 - locknut
Pulley assemblies
3½-inch Pulley (used on
titanium parts)
1 - zinc bolt
2 - zinc washers
1 - zinc locknut
3½-inch Pulley (used on gray
painted parts)
1 - bolt
2 - washers
1 - locknut
Lat Pulley Cable
130208