


page 6
C O M M E R C I A L P R O D U C T S D I V I S I O N
CAUTION: Be sure to get the appropriate number of people to help you
move the treadmill to its final location. A fully-assembled C964i or
C962i treadmill is very heavy and you might injure yourself if you move
the treadmill improperly.
11. If you need to move the treadmill, ask for assistance. Roll the treadmill on
its front wheels to its new location by lifting the rear end of the unit.
CAUTION: Do not remove or otherwise bypass the 3-prong plug with
an adapter in order to use a non-grounded outlet. Do not plug the
treadmill into a power transformer in an attempt to adjust the voltage
requirements.
12. The treadmill requires a dedicated circuit. Plug the treadmill into a grounded
outlet with a dedicated circuit. Make sure that no other product or machine
uses the same circuit as the treadmill.
13. Continue to Checking the Alignment of the Running Belt to complete the
installation of the treadmill.
CHECKING THE ALIGNMENT OF THE RUNNING BELT
The belt is aligned at the factory before shipment. However, during shipment or
by using the treadmill on an uneven surface, the belt might move off center.
Proper belt alignment is important because it allows the belt to remain centered
and assures smooth operation.
Follow these steps to check the alignment:
CAUTION: Do not walk on the running belt during this procedure.
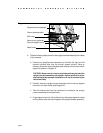
1. The C964i and C962i have adjustable rear feet. Check to make sure that the
running surface is level before continuing with the following steps. If the
treadmill is placed on a slightly, uneven surface, adjusting the rear feet can
help, but will not compensate for extremely uneven surfaces.
Important: The maximum recommended height that you raise or lower the
rear of the treadmill should be no more than a 1/4". You can turn the rear foot
counterclockwise or clockwise using a crescent or open-end wrench.
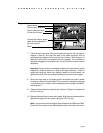
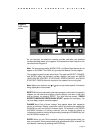
2. Check to be sure that the safety switch is positioned at the green dot before
turning ON the treadmill. Locate the ON/OFF power switch at the front of the
hood and turn it to ON ( I ).