


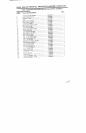


704101 REGGIE WHITE ALL PRO SYSTEM ASSEMBLY INSTRUCTIONS
37.
38.
39.
40.
41.
42.
43.
44.
45.
46.
47.
48.
49.
50.
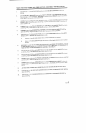
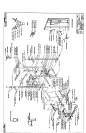
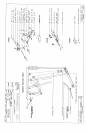
Assemble the LEFT and RIGHT ADJ. PAD SUPPORTS to the BENCH TOP as shown on drawing, "
using one (!) 3/8 X 6 IN. BOLT, and one (1) 3/8 IN. LOCK NUT. (TIGHTEN THE CONNECTION
ENOUGH TO REMOVE THE PLAY, YET ALLOWING THE ADJ. PAD SUPPORT TO ROTATE
FREELY)
SECURELY assemble the LARGE BACK PAD to the LEFT and RIGHT ADJ. PAD SUPPORTS as
shown on drawing, using four (4) 3/8 X 1-1/2 IN. BOLTS, and four (4) 3/8 IN. LOCK WASHERS.
SECURELY assemble the SEAT PAD to the BENCH TOP as shown on drawing, using t~,’o (2) 3/8 X
I/2 IN. BOLTS. and two (2) 3/8 IN. LOCK WASHERS.
Insert two (2) 1-3/4 IN. SQ. END CAPS into the ends of the LEG PEDESTAL as shown on drawing.
Assemble two (2) 4 X 7 IN. ROLLER PADS, and one (l) ROLLER PAD SHAFT to the
PEDESTAL as shown on drawing, using two (2) MUSHROOM CAPS.
Also assemble two (2) 4 X 7 ROLLER PADS to the ROLLER PAD SWIVEL as shown on drawing,
using two (2) MUSHROOM CAPS.
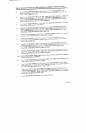
AssembLe the ROLLER PAD SWIVEL and the LEG PEDESTAL to the PLATES of the FRONT LEG
as shown on drawing, using one (1) 3/8 X 3-I/4 IN. BOLT, four (4) 3/8 IN. WASHERS, and one (I)
IN. LOW HEIGHT LOCK NUT.(TIGHTEN THE CONNECTION ENOUGH TO REMOVE THE
PLAY, YET ALLOWING THE ROLLER PAD SWIVEL AND LEG PEDESTAL TO ROTATE
FREELY)
Attach one (I) 3/4 IN. SQ. RUBBER BUMPER to the LEG PEDESTAL where it contacts tile top BOLT
on the FRONT LEG.
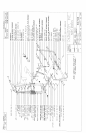
Slide four (4) I X 8 IN. GRIPS over each end of both the LAT BAR, and the LOW ROW BAR. (NOTE:
IF A LUBRICANT IS REQUIRED, RUBBING ALCOHOL THOROUGHLY COATING THE
INSIDE OF THE GRIP IS THE BEST MATERIAL TO USE) (SEE DETAIL A AND
Attach the LAT BAR to the HIGH PULLEY CABLE, and the LOW ROW BAR to the LOW PULLEY
CABLE, by using two (2) SNAP HOOKS. (SEE DRAWING)
To adjust the LOW ROW BAR. Remove the LOW ROW BAR from the SNAP HOOK on the LOW
PULLEY CABLE, and attach the CHAIN. Attach another SNAP HOOK to the LOW ROW BAR and
adjust it to the desired CHAIN LINK. (SEE DETAIL B)
Attach two (2) sets of UPRIGHT LABELS to the inside surface of both FRONT UPRIGH~[’S as shown
drawing.
To perform DECLINE PRESS or AB CRUNCHES, rotate the REAR LEG underneath the BENCH, and
allow the end of the BENCH TOP to rest on the floor. Insert on’e (1) L-PIN into the BUSHING of the
LEG PEDESTAL to assure leg hold down during the exercise.
To perform INCLINE PRESSES, rotate the LARGE BACK PAD up to the desired height and insert one
(1) BALL PIN through both plates of the ADJ. PAD SUPPORTS, and allow the PIN to rest on top of the
BENCH TOP.
8
11/21/95