


NVS 6
MANUAL
Page 28
counterclockwise direction until it is retained in the ON position and check
to see that the unit operates properly. In so doing, see to it that the
image-intensifier tube screens start glow steadily in amber-green
(without flashes and twinkling) in the monocular pair of the night-vision
goggles.
CAUTION: TO SAFEGUARD THE UNIT AGAINST DAMAGE, MAKE
ABSOLUTELY SURE THAT THE SAFETY CAPS ARE FITTED ON THE
LENSES WHEN THE NIGHT-VISION GOGGLES ARE TURNED ON IN
THE PRESENCE OF LIGHT.
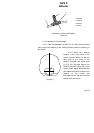
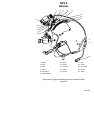
6.2.8 Depress button (7) and displace LH side monocular (28) with
respect to the immobile RH side monocular, along guide (8) to
preliminarily select the optimum distance between the eye pupils in
accordance with the interpupilary distance of the operator. Release button
(7) and the LH side monocular will be locked in the selected position.
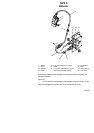
6.2.9 Turn cap (6) of cap-switch (5) in the clockwise direction as far
as it will go to de-energize the night-vision goggles.
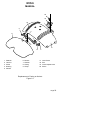
6.2.10 Take hold of the monocular pair with one hand and the fixing
assembly with the other hand, and transfer the night-vision goggles to the
stowed position as shown in Fig. 6.5 (i.e. fold up the fixing assembly by
overcoming the retainer force that locks the goggles in the operating
position).
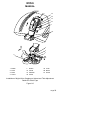
6.2.11 Remove mount (26), part of the single set of spare parts,
designed for attaching the night-vision goggles, from the outer pocket of
the case and install it on the front portion of the helmet. To do so, insert
three screws (27) into the threaded holes in the helmet casing and tighten
them.
6.2.12 Remove counterweight (9) (Ref. Fig. 6.4) from the outer
pocket of the case, install it on the rear portion of the helmet and secure it
by means of the sticking fastener.