


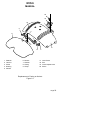

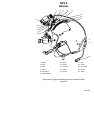
NVS 6
MANUAL
Page 23
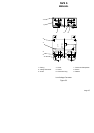
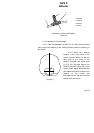
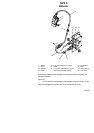
Should the monocular pair fail to be locked relative to the unit fixing
assembly, proceed as follows:
– Move knob (2) (Ref. Fig. 6.4) to the top position (the hinged joint,
in this case, will be fully released).
– Pull out plate (3), which retains screw (4) in the locked position,
with your thumb and forefinger, turn it to the next locking position in the
clockwise direction and release the plate. The plate shall be set to a new
locking position (Ref. Step 6.2.2).
– This done, lock the hinged joint linking the monocular pair to
the unit fixing assembly again by applying an effort to knob (2) so as to
bring it down as far as it will go.
If the monocular locking continues to fail, carry out the above
procedure one more time.
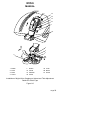
6.2.4 Take power supply components (two batteries of type size AA
R6 1.5V or rechargeable batteries) out of the case. When using the
rechargeable batteries, first charge them in accordance with the Manual
furnished with the battery-charging unit.
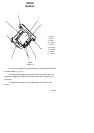
6.2.5 Insert two batteries into the recess of guide (8) with the positive
contact directed inwards by first unscrewing and removing cap-switch (5),
and then screw it in fully in the clockwise direction.
6.2.6 Release knob (2) and set the top portion of the fixing assembly
perpendicular to the axes of monocular (28) and monocular (29). While
holding the fixing assembly in one hand, displace the monocular pair with
the other hand forward and downward until they are butted up against the
cruciform guides of the fixing assembly. Once completed, tighten the
knob to lock the monocular pair in the desired position.
WARNING: NEGLECT OF THE REQUIREMENTS DESCRIBED IN
THE ABOVE STEP MAY RESULT IN EYE INJURY DURING THE
COMPLETION OF FURTHER PREPARATORY OPERATIONS.