3
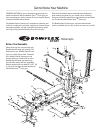
Get To Know Your Machine
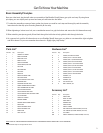
Parts List*
Item No. Qty. Description
1 1 LOWER LAT TOWER
2 1 BASE PLATFORM
3 1 BASE RIGHT LEG
4 1 BASE LEFT LEG
5 1 SQUAT PLATFORM
6 1 CHEST BAR W/ PULLEYS
7 1 SEAT PAD
8 1 SEAT BRACKET
9 1 SEAT RAIL
10 1 REAR LEG
11 1 REAR LEG CROSS TUBE
12 1 SEAT RAIL KNOB
13 1 LEG EXTENSION PIVOT TUBE
14 6 FOAM ROLLERS
15 6 FOAM ROLLER END CAPS
16 2 SHORT CHROME ROLLER TUBES
17 1 LONG CHROME ROLLER TUBE
18 2 ROLLER TUBE SPACERS
19 1 LEG EXTENSION SEAT PAD
21 1 LEG EXTENSION SEAT SUPPORT TUBE
22 1 LAT CROSS BAR
23 1 UPPER LAT TOWER
24 1 ROD BOX FRAME
25 1 ROD BOX WITH POWER RODS®
26 1 FACEPLATE
27 1 FACEPLATE BACK RIGHT
28 1 FACEPLATE BACK LEFT
29 1 BENCH PAD
30 1 LOCK OUT PIN
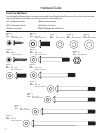
Hardware List*
Item No. Qty. Description
A 4 SCREW, #10 PHILLIPS HEAD
B 3 SCREW, #10 X 1" PHILLIPS HEAD
C 8 SCREW, 5/16" X 3/4" BUTTON HEAD
E 10 SCREW, 3/8" X 3/4" BUTTON HEAD
F 1 SCREW, 3/8" X 2 1/2" BUTTON HEAD
G 1 SCREW, 3/8" X 2 3/4" BUTTON HEAD
H 8 SCREW, 3/8" X 3" BUTTON HEAD
I 2 SCREW, 3/8" X 3 1/4" BUTTON HEAD
J 2 SCREW, 3/8" X 4 1/4" BUTTON HEAD
K 4 SCREW, 3/8" X 5" BUTTON HEAD
L 3 WASHER, 1/4"
M 8 WASHER 5/16"
N 46 WASHER, 3/8"
O 18 NYLOCK NUT 3/8"
Q 9 BOLT COVERS, 3/8"
Accessory List*
Item No. Qty. Description
R 1 SQUAT BAR
S 1 BENT LAT BAR
T 2 HAND GRIPS
U 1 ROWING BELT
V 2 SNAP HOOKS
W 2 SQUAT STRAPS
Y 2 ROD CABLES W/ 2 SNAP HOOKS (attached)
Z 2 LAT CABLES W/ 2 SNAP HOOKS (attached)
AA 1 LEG CABLE
BB 2 SQUAT CABLES W/ 2 SNAP HOOKS (attached)
NOTE: LEAVE ALL CABLES WRAPPED AND BAGGED UNTIL YOUR BOWFLEX SPORT® HOME GYM IS FULLY ASSEMBLED.
*Specifications subject to change without notice.
Basic Assembly Principles
Here are a few basic tips that will make your assembly of the Bowflex Sport® home gym quick and easy. By using these
principles, you can simplify each process and save yourself extra time and effort.
1. To make the assembly process go faster, gather the pieces you need for each step and thoroughly read the assembly
instructions for that step prior to starting assembly for the step.
2. When tightening a locknut on a bolt, use a combination wrench to grip the locknut and ensure that it is fastened securely.
3. When attaching two pieces, gently lift and look through the bolt holes to help guide the bolt through the holes.
4. As a general rule, and for all bolts and nuts on your Bowflex Sport® home gym, turn bolts or nuts toward the right to tighten
and left to loosen. Or you can remember the mnemonic: “Righty tighty, lefty loosey.”


