


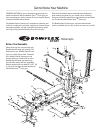


10
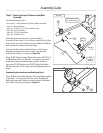
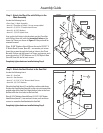
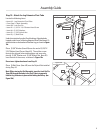
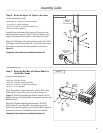
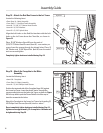
Step 9 - Attach the Seat Rail to the Main Assembly
Locate the following items:
• From Step 4 - Main Assembly
• From Step 8 - Seat Rail Assembly
• Item #12 - Seat Rail Knob
• Item #J - (1) 3/8" X 4 1/4" Button Head Screw
• Item #N - (2) 3/8" Washers
• Item #O - (1) 3/8" Nylock Nut
• Item #Q - (1) Bolt Cover
Align the holes on the Seat Rail Assembly (from Step 8)
with the holes in the Rail Bracket on the Main Assembly
(from Step 4), as shown in Figure 9
.
Insert the Seat Rail Assembly into the Seat Rail Bracket,
and then place (1) 3/8" Washer (Item #N) over the end of (1)
3/8" X 4 1/4" Button Head Screw (Item #J). Insert the screw
through the aligned holes, as shown, and place (1) 3/8"
Washer and (1) 3/8" Nylock Nut (Item #
O) over the end of the
screw to secure.
Do not over-tighten the hardware from Step 9.
Note: Tighten the nylock nut enough that the threads of the screw
extend through the nylock nut, but loosely enough that the Seat
Rail Assembly can move freely.
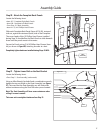
At this time, place (1) Bolt Cover (Item #Q) over the Nylock
Nut installed during Step 9. Then, thread the Seat Rail Knob
(Item #12) into the top hole on the Seat Rail Bracket, as
shown in Figure 9, but do not over-tighten.
Figure 9
Rail
Assembly
Main
Assembly
12
N
O
Seat Rail
Bracket
J
Assembly Guide