


8
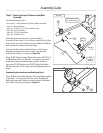
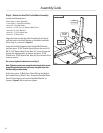
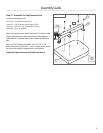
Step 6 - Attach the Seat Rail to the Seat Assembly
Locate the following items:
• From Step 5 - Seat Pad/Seat Bracket Assembly
• Item #9 - Seat Rail
Undo the twist ties from the Rail Pivot Bushings and remove the
Bushings. Set aside until the end of this step.
Line up the Seat Rail (Item #9) with the Seat Assembly (from Step
5). Orient the Seat Rail so that the Pull Pin on the Seat Bracket is
on the same side as the holes in the Seat Rail.
Pull out the Pull Pin on the Seat Bracket, and then insert the
Seat Rail through the Seat Bracket, (see Figure 6).
To adjust the Seat, slide the Seat until the Pull Pin is aligned
with one hole, then release the Pull Pin into the hole.
Once you have attached the Seat Assembly to the Seat Rail,
reinstall the Rail Pivot Bushings that you removed at the
beginning of this step.
Note: See Step 22 to adjust the Seat Bracket.
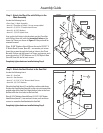
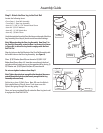
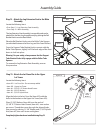
Step 7 - Attach the Rear Leg to the Rear Leg Cross
Tube
Locate the following items:
• Item #10 - Rear Leg - Do not unwrap cables!
• Item #11 - Rear Leg Cross Tube
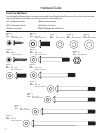
• Item #H - (2) 3/8" X 3" Button Head Screws
• Item #N - (4) 3/8" Washers
• Item #O - (2) 3/8" Nylock Nuts
Line up the holes in the bracket on the Rear Leg (Item #10) with
the holes in the Rear Leg Cross Tube (Item #11) as shown in
Figure 7.
Place (2) 3/8" Washers (Item #N) over the end of (2) 3/8" X 3"
Button Head Screws (Item #H) - one per each screw. Insert
the screws through the lined up holes, and secure by placing
(1) 3/8" Washer and (1) 3/8" Nylock Nut (Item #
O) over the end
of each screw, as shown in Figure 7
.
Completely tighten hardware installed during Step 7.
Figure 7
H
N
O
10
11
Rear Leg
Bracket
Figure 6
9
Seat Pad/Seat
Bracket Assembly
Holes in the
Seat Rail
Pull Pin
Rail Pivot
Bushings
Assembly Guide