


14
Most treadmill problems can be solved by following the steps below. Find the symptom that applies, and
follow the steps listed. If further assistance is needed, please see the front cover of this manual.
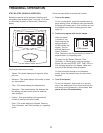
1. SYMPTOM: THE CONSOLE DOES NOT
FUNCTION PROPERLY
a. Replace the batteries in the console (see assem-
bly step 7 on page 10).
b. Make sure that the reed switch is properly
adjusted (see assembly step 5 on page 9).
c. Make sure that the handrail wire is plugged fully
into the wire on the console (see assembly step 8
on page 10).
d. The console, like most electronics, is susceptible
to static electricity build-up caused by certain
types of clothing or by the operation of the
treadmill. If the display is blank or gives incorrect
readings, apply an anti-static spray to the hand-
rail. Anti-static spray is available where laundry
supplies are sold.
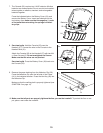
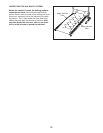
2. SYMPTOM: THE WALKING BELT DOES NOT
MOVE SMOOTHLY
a. If the walk-
ing belt
is over-
tightened,
performance
may be
reduced and
the walking
belt may be
permanently
damaged.
Using the
hex key,
turn both
rear roller adjustment screws counterclockwise
1/4 of a turn. When the walking belt is properly
tightened, you should be able to lift each edge
of the walking belt 2 to 3 in. (5 to 7 cm) off the
walking platform. Be careful to keep the walk-
ing belt centered. Walk on the treadmill for a few
minutes. Repeat until the walking belt is properly
tightened.
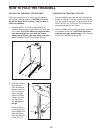
3. SYMPTOM: THE WALKING BELT SLIPS OR IS
OFF-CENTER
a. If the walk-
ing belt slips
when walked
on, use the
hex key to turn
both adjust-
ment screws
clockwise,
1/4 of a turn. When the walking belt is properly
tightened, you should be able to lift each edge of
the walking belt 2 to 3 in. (5 to 7 cm) off the walk-
ing platform. Be careful to keep the walking belt
centered. Walk on the treadmill for a few minutes.
Repeat until the walking belt is properly
tightened.
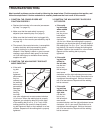
b. If the walk-
ing belt has
shifted to
the left side,
use the hex
key to turn
the left adjust-
ment screw
clockwise, and the right adjustment screw coun-
terclockwise, 1/4 of a turn each. Be careful not to
overtighten the walking belt. Walk on the tread-
mill for a few minutes. Repeat until the walking
belt is centered.
c. If the walk-
ing belt has
shifted to the
right side,
use the hex
key to turn
the left adjust-
ment screw
counterclockwise, and the right adjustment screw
clockwise, 1/4 of a turn each. Be careful not to
overtighten the walking belt. Walk on the tread-
mill for a few minutes. Repeat until the walking
belt is centered.
2 –3 in.
Screws
Walking Belt
TROUBLESHOOTING