


14
Press the Start button or the Speed increase
button to start the program.
A moment after the button is pressed, the tread-
mill will automatically adjust to the first speed set-
t
ing for the program. Hold the handrails and begin
walking.
Each program is divided into 30 one-minute peri-
ods. One speed setting is programmed for each
period. Note: The same speed setting may be pro-
grammed for two or more consecutive periods.
When only three seconds remain in the first peri-
od of the program, a series of tones will sound. If
a different speed setting is programmed for the
upcoming period, the Speed zone of the display
will flash. The treadmill will then automatically
adjust to the speed setting for the second period.
The program will continue until no time remains in
the Time/Pace zone of the display. The walking
belt will then slow to a stop.
Note: If the speed setting for the current period is
too high or too low, you can manually override
the setting by pressing the Speed buttons.
Important: When the current period of the pro-
gram ends, the treadmill will automatically
adjust to the speed setting for the next period.
To stop the program, press the Stop button. The
Time/Pace zone of the display will begin to flash.
To restart the program, press the Start button or
the Speed increase button. The walking belt will
begin to move at 1 mph. When the next period of
the programs begins, the walking belt will change
to the speed setting for the next period. To end
the program, press the Stop button, remove the
key, and then reinsert the key.
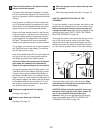
Follow your progress with the display.
See step 4 on page 12.
Measure your heart rate if desired.
See step 6 on page 13.
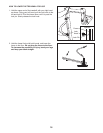
When the program ends, remove the key from
the console.
When the program ends, see step 7 on page 13.
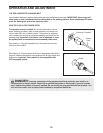
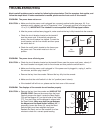
HOW TO CHANGE THE INCLINE OF THE
TREADMILL
To vary the intensity of your exercise, the incline of the
treadmill can be changed; there are four incline levels.
Before changing the incline, remove the key and
unplug the power cord.
Next, fold the treadmill to the
storage position (see HOW TO FOLD THE TREAD-
MILL FOR STORAGE on page 15).
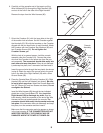
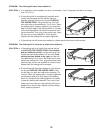
To change the incline, first remove the incline pin from
one of the incline legs as shown at the right. Next,
adjust the incline leg to the desired height, and fully
reinsert the incline pin. Make sure that the incline pin
is in the “locked” position shown in the inset drawing.
Adjust the other incline leg in the same way.
Make
sure that both incline pins are inserted from the
direction shown in the drawing.
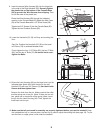
CAUTION: Before using the treadmill, make sure
that both incline legs are at the same height. Do
not use the treadmill with the incline pins
removed. After you have adjusted the incline legs,
lower the treadmill (see HOW
TO LOWER THE
TREADMILL FOR USE on page 16).
6
5
4
3
Incline
Pin
Incline
Pin
Incline
Pin