


4
OWNER’S MANUAL
•
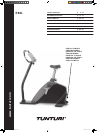
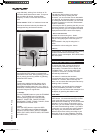
E80L
NOTE ABOUT
ASSEMBLING THE
EQUIPMENT
Start by unpacking the equipment. The
detailed assembly instructions can be
found at the back of this guide. Follow
the instructions in given order.
Before assembly, check the contents of
the package. If a part is missing, please
contact your dealer with the model,
equipment serial no. and spare part no.
of the missing part. You’ll find a spare
part list at the back of this guide. The
hardware kit contents are marked with
* in the spare parts list. The directions
left, right, front and back are defined as
seen from the exercising position. Keep
the assembly tools, as you may need
them e.g. for adjusting the equipment.
Note that two people are needed for the
assembly.
The packaging includes a silicate bag for
absorbing moisture during storage and
transportation. Please dispose of the bag
once you have unpacked the equipment.
Allow at least 100 cm of clearance
around the equipment. We also
recommend opening the package and
assembling the product on a protective
base.
SAVE THIS INSTRUCTION MANUAL
WELCOME TO THE WORLD OF
TUNTURI EXERCISING!
Your choice shows that you really want to invest
in your well being and condition; it also shows
you really value high quality and style. With
Tunturi Fitness Equipment, you’ve chosen a
high quality, safe and motivating product as your
training partner. Whatever your goal in training,
we are certain this is the training equipment to
get you there. You’ll find information about using
your exercise equipment and what makes for
efficient training at Tunturi’s website at www.
tunturi.com.
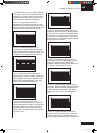
ADJUSTMENTS
SEAT
Set the right height for you; the basic rule is
that the arch of the foot reaches reaches the
the pedal at its lowest point with the leg almost
straight. Adjust the seat height by loosening the
seat locking knob. Hold on to the seat with one
hand and, using your other hand, pull the locking
knob outwards in order to enable free seat tube
movement upwards and downwards. Once the
height is right, let go of the knob and the seat
locks into place. Turn the locking knob clockwise
to tighten.
NOTE! Always make sure that the locking knob is
properly fastened before starting to exercise!
To adjust the horizontal seat position forward
and back, loosen the locking screws under the
seat. You can also adjust inclination from here.
Release the seat lock by turning the locking lever
located under the seat anti-clockwise. Adjust
the seat to the desired position and tighten the
locking lever by turning it clockwise.
HANDLEBAR SETUP
Loosen the locking screws on the front of the
handlebar support and find the right angle at
which to position the handlebar. Tighten the
locking screws. The design of the handlebar
allows you to exercise either in an upright
position or with the upper body leaning forward.
Remember, however, always to keep your back
straight.
CONSOLE INCLINATION ADJUSTMENT
Set the inclination of the meter so that it
corresponds to your height and exercise position.
ADJUSTMENT OF SUPPORT FEET
If the equipment is not stable, adjust the
adjustment screws below the support feet as
necessary.
EXERCISING
Working out with this device is excellent aerobic
exercise, the principle being that the exercise
should be suitably light, but of long duration.
Aerobic exercise is based on improving the
body’s maximum oxygen upteke, which in turn
improves endurance and fitness. The ability
of the body to burn fat as a fuel is directly
dependent on its oxygen-uptake capacity.
Aerobic exercise should be above all pleasant.
You should work up a light sweat but you should
not get out of breath during the workout.
You should exercise at least three times a
week, 30 minutes at a time, to reach a basic
fitness level. Maintaining this level requires a
few exercise sessions each week. Once the
basic condition has been reached, it is easily
improved, simply by increasing the number of
exercise sessions. You should start slowly at a
low pedalling speed and low resistance, because
for an overweight person strenuous exercise
E80L-07_005_WARRANTY.indd 4 14.9.2007 12:11:08