


-- 7 --
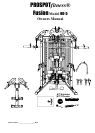
Instructions for Assembly of the ProSpotfitness® HG-5 (Con’t.)
Step #6 MESH COVERS & ACCESSORIES
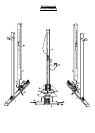
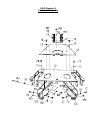
1. Referencing Diagrams (1 & 12) first attach the Side Mesh Cover Frames (28 & 29) one side at a time.
Set Side Frame on the hooks near the base of the unit. One hook is part (69) and the other hook is on the
Rear Bottom Panel (5). Then attach the front top corner of the Side Frame (28 & 29) to the Front Top Panel
with M4*16) Screws (116) and M4 Washers (117).
2. To install the Rear Cover Frame (30) you need to temporarily unplug the power cords and then re-feed
these power cords thru the grommet hole in the Rear frame after it is installed. To install the Rear Mesh
Cover Frame (30) to the back of the unit align the pins of the two Side Frames with the holes in Rear Frame
and slide down onto the pins of the Rear Bottom Panel (5). These sometimes are a tight fit because of paint
build up on pins and holes.
3. Next find the correct Mesh Cover (150 Left side & 151 Right side) for installation. Starting at the front of
the unit stick the Velcro Cover in place and wrap around the back keeping the cover tight. Do not over
stretch Mesh material, this will cause wrinkles.
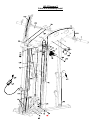
4. As shown in Diagram 10 install the Front Plastic Panel (152).
5. As shown in Diagram 7, drop in Angled Front Panel (130) between the Upper Linking Plate assemblies
onto the Front Top Panel and rest it on the Panel Tabs.
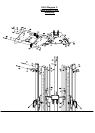
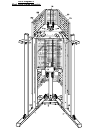
6. Weight Storage and Accessory Stand: As shown in Diagram 12 attach the Bottom Rails (40) to the
Weight Stand Main Frame (39) using M12*75 Bolts M12 Washers (72) and M12 Nuts. Make sure the curved
holders on the Bottom Rails (40) are facing inward toward each other. Tighten bolts securely.
7. Next Assemble the VKR Arm Pads (43 right & 44 left) to the respective VKR Frames (41 right & 42 left)
using M8 x 60 Bolts (124), M8 Washers (119). Tighten bolts securely.
8. Next Install the VKR vertical Handles (101) on to the VKR Frames (41 & 42) using M10 x25 Bolts (88)
and M10 Washers (119) Note there two positions for these handles.
9. Rubber Bumper Pad (94) goes on Storage Posts before any weights are put on it. Lat Leg Hold Down
Bar (21) stores vertically in center hole of Weight Storage Accessory stand.
10. Using the Foot Pump (87) inflate Stability Ball (85) to required firmness. Do not over inflate.