


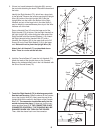


16
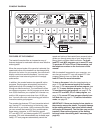
HOW TO USE THE CALORIE GOAL PROGRAM
1
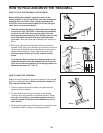
. Insert the key into the console.
S
ee HOW TO TURN ON THE POWER on page
12.
2. Enter your weight if desired.
See step 2 on page 12.
3. Select the calorie goal program.
To select the calorie
goal program, press the
Program button repeat-
edly until a goal of 50
calories and the words
“SET CALS. GOAL” ap-
pear in the upper left corner of the display. When
the calorie goal program is selected, a speed set-
ting of 2.5 mph will flash in the display. The display
will also show how long the program will last.
If desired, change the
calorie goal by pressing
the Cals. increase or de-
crease button. Each
time you press a button,
the calorie goal will
change by 50 calories; the calorie goal can be from
50 to 450 calories. In addition, press the Speed in-
crease or decrease button or one of the ten num-
bered Speed buttons to change the speed setting if
desired.
Note: As you change the calorie goal or the speed
setting, the program time will automatically be re-
calculated—the higher the calorie goal is, or the
lower the speed setting is, the longer the program
will last.
4. Press the Start button to start the program.
A moment after the button is pressed, the walking
belt will begin to move at 2.5 mph (or the speed
setting that you selected). Hold the handrails and
begin walking.
To change the speed of the walking belt or the in-
cline of the treadmill at any time during the pro-
gram, press the Speed or Incline buttons. Note:
Each time you change the speed of the walking
belt, the time remaining in the program will auto-
matically be recalculated.
While you exercise, the console will show the num-
ber of calories still to be burned. When you reach
your calorie goal, the walking belt will slow to a
stop.
5.
Follow your progress with the display.
See step 6 on page 12.
6.
Measure your heart rate if desired.
See step 7 on page 13.
7.
Turn on the fan if desired.
See step 8 on page 13.
8. When you are finished exercising, remove the
key from the console.
See step 9 on page 13.