


10
R
EMOVING AND REPLACING THE WAX BAG
The wax lubrication system is a standard feature on the 91Ti model and international 90T model.
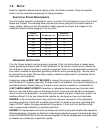
Treadmills with waxers are equipped to monitor wax levels automatically. On the 91Ti, when the the
wax bag is six-percent full, the console displays “NOTIFY MAINTENANCE -- WAXER NEEDS
REFILL”. When the bag is empty, the treadmill shuts down, and the console displays, “NOTIFY
MAINTENANCE -- WAXER EMPTY”. On a waxer-equipped 90T model, when the wax bag is six-
percent full, the DATA DISPLAY windows show “Err9”. When the wax bag is empty, the treadmill
shuts down and the DATA DISPLAY windows show, “Err10”.
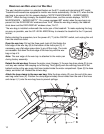
The wax bag is installed underneath the motor pan of the treadmill. To make replacing the bag
as easy as possible, use the UP LEVEL ARROW key to elevate the treadmill to the 15 percent
incline.
Before starting the procedure, turn the power off (“I”) at the ON/OFF switch, and unplug the unit
from the electrical outlet.
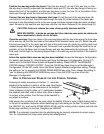
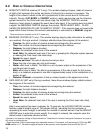
Open the wax tray: Pull out the three push rivets (A) that fasten the
front edge of the wax tray (B) to the bottom of the motor pan (C). If
necessary, use a flat-edge screw driver to pry off the rivets. The rivets
are reusable. Set down the front edge of the wax tray with the wax
bag on top of it.
Note: The rear edge of the wax tray is attached to the motor pan
during factory assembly.
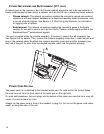
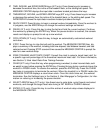
Detach the old wax bag: Remove the motor cover. Engage (1) the wax bag hose clamp (D) to pre-
vent any wax residue from seeping out of the bag. Then, gently work the wax bag hose off of the
barbed nozzle on the wax pump inlet hose located inside the motor compartment. Open (2) the hose
clamp, and slide it off. Discard the old wax bag.
Attach the hose clamp to the new wax bag: Slide the hose clamp (D) over the end of the new
wax bag outlet hose (E). Position the clamp approximately three inches from the end of the hose
and clamp it (1) onto the wax bag hose to prevent spillage.