


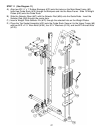
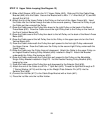
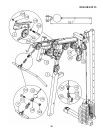
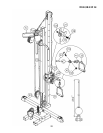

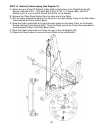
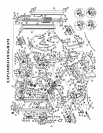
STEP 15 Lower & AB Cable Looping (See Diagram 15)
A.) Insert the 265” Lower Cable underneath the Pulley on the Leg Developer (#12).
B.) Draw the Cable underneath the Pulley along the Main Base Frame to the Pulley under the
Seat. Continue drawing the Cable along the Base Frame through the opening on the bottom
of the Front Vertical Beam to the Pulley on the rear of Main Base Frame.
C.) Draw the Cable underneath the Pulley then pull upward to the left Pulley underneath the
Upper Frame (#5). Draw the Cable around the Pulley then pull downward. Attach the Cable
to the upper Pulley on the Double Floating Pulley Brackets (#27) previously installed in Step-
12.
D.) Draw the Cable around the Pulley then upward to the left Pulley under the Upper Frame. Let
the Bracket hanging for now.
E.) Draw the Cable around the Pulley then downward. Attach the Cable to the upper Pulley on
an Angled Double Floating Pulley Bracket (#26) previously installed in Step-12.
F.) Draw the Cable underneath the Pulley then upward to the Pulley in the middle opening on
the Front Vertical Beam. Draw the Cable over the Pulley and through the opening.
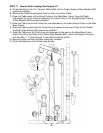
G.) Install the Ball Stopper (#70) and the Cable Strap Bracket (#45) to the Cable. Connect a
Hook (#41) to the Cable Strap Bracket and secure with the M8 x 1 ¼” Allen Bolt (#110) and
M8 Aircraft Nut (#124) on the Bracket.
H.) Connect the AB Strap (#58) or Triceps Rope (#59) to the Hook for various exercises.
I.) Use a Hook (#41) to connect a Chain (#40) to the clip on the end of the Cable in front of the
Leg Developer (#12).
J.) Use a Hook (#41) to connect the Ankle Strap (#57), Double Handle (#34), or Shiver Bar (#33)
to the Chain for various exercises.
K.) Note: After completing the entire Cable installations, adjust the tightness of the Cable Loop
System by adjusting the height of the Pulley Pre-tensioner (#24). Lower the Pre-tensioner so
it touches the top of the Pulley Bracket.
23