BEFORE
YOU BEGIN
18
INTRODUCTION
IMPORTANT
PRECAUTIONS
ASSEMBLY
BEFORE
YOU BEGIN
ELLIPTICAL
OPERATION
LIMITED
WARRANTY
TROUBLESHOOTING
& MAINTENANCE
CONDITIONING
GUIDELINES
ASSEMBLY
ELLIPTICAL
OPERATION
BEFORE
YOU BEGIN
ASSEMBLY
19
INTRODUCTION
IMPORTANT
PRECAUTIONS
ELLIPTICAL
OPERATION
CONDITIONING
GUIDELINES
TROUBLESHOOTING
& MAINTENANCE
LIMITED
WARRANTY
ELLIPTICAL
OPERATION
ASSEMBLY
E L L I P T I C A L O P E R AT I O N
POWER
Your programmable elliptical is powered by a power supply. The power must be plugged into the power jack,
which is located in the front of the machine near the STABILIZER TUBE. Make sure the power switch located
next to the power jack is in the ON position.
INCLINE OPERATION
If the stop button is pressed to pause the program, the incline motor will remain at its current height. To
return the incline to 0%, press start and change the incline to 0% before dismounting or hold the stop button
for 3 seconds to reset the console and the incline will return to 0%.
Do not operate the elliptical if the power cord or plug is damaged.
If the elliptical appears to not be working properly, do not use the elliptical.
MOVING
Your elliptical has a pair of transport wheels built
into the FRONT STABILIZER TUBE. To move, first
remove the power supply and firmly grasp the
REAR STABILIZER BAR, carefully lift and roll.
Note: Be sure to grab the bar and not the
plastic cover.
Our ellipticals are well built and heavy, weighing up to 280 lbs! Use care and
additional help if necessary when moving.
FOOT POSITIONING
Your elliptical offers a variety of foot positions. Moving your foot to the forward most position of the foot pad
increases your step height, which will create a feel similar to a step machine. Placing your foot toward the back
of the foot pad decreases your step height and creates more of a gliding feel, similar to a smooth walk or run.
Your elliptical also allows you to pedal both forward and backwards to offer a variation to your workout and to
focus on other major leg muscle groups such as your hamstrings and calves.
WARNING
WARNING
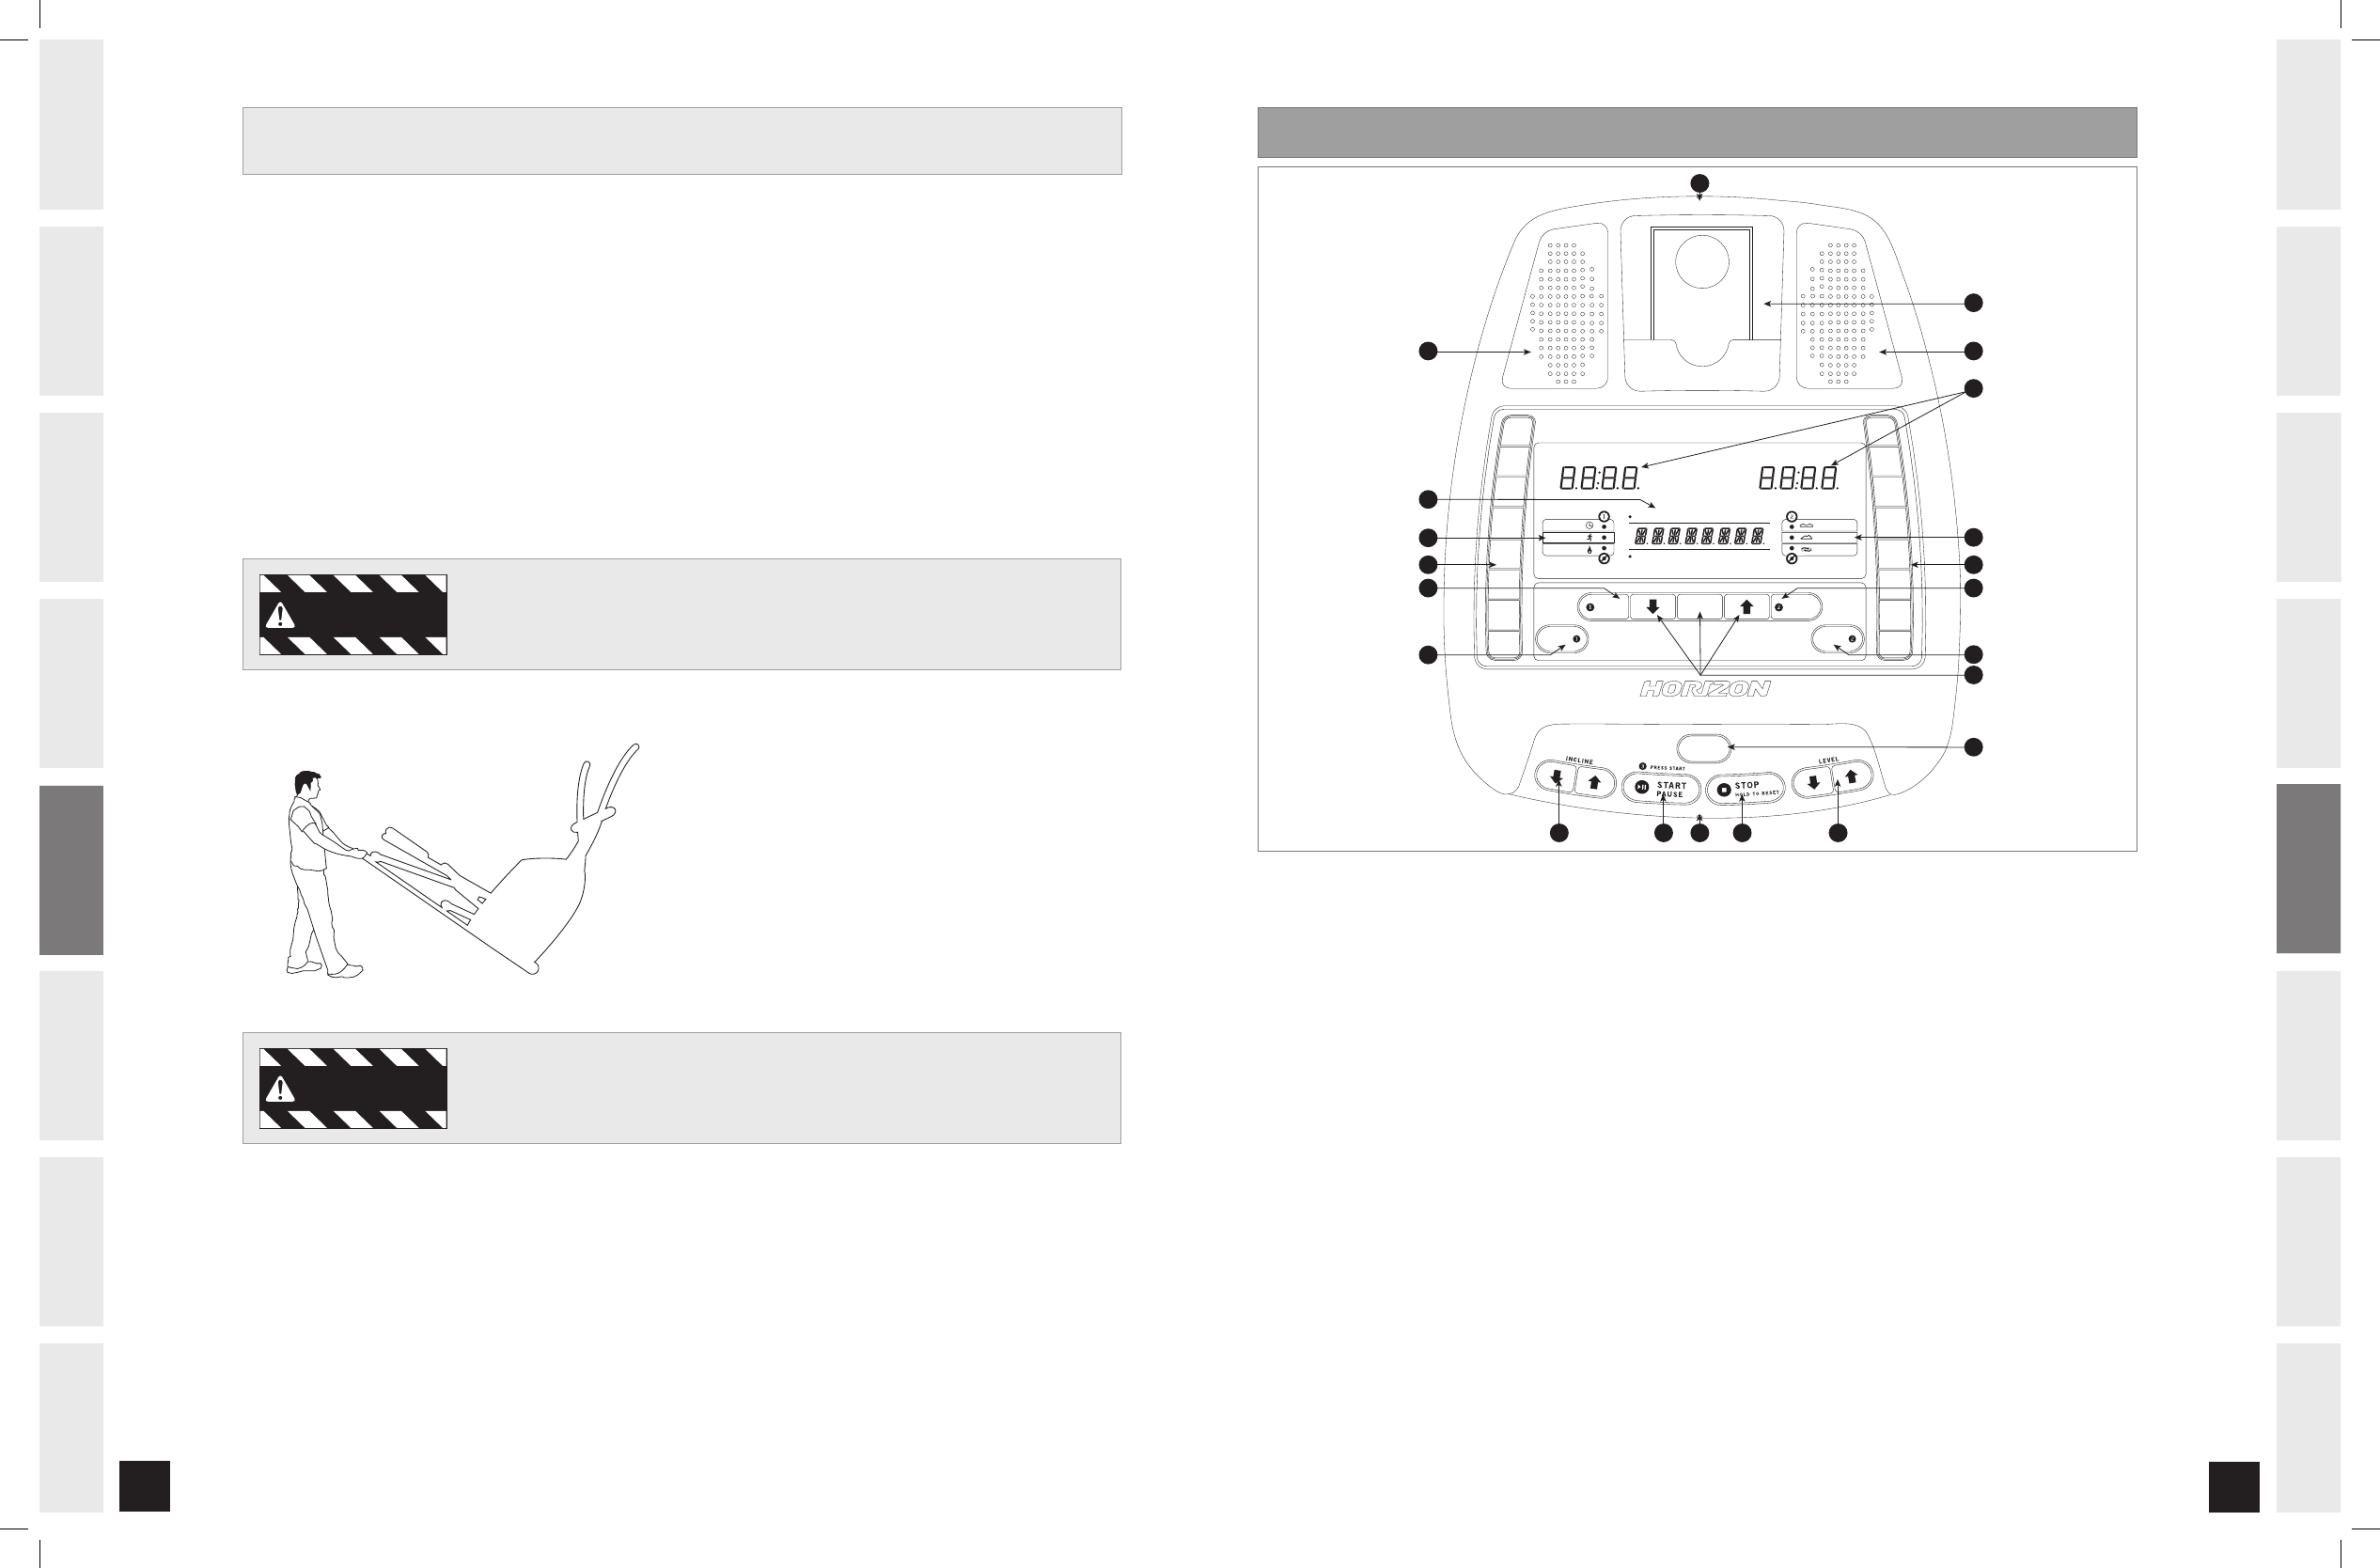
E X - 7 7 CO N S O L E DI S P L AY
Note: there is a thin protective sheet of clear plastic on the overlay of the console that should be removed before use.
LED WINDOWS: Indicates exercise feedback (time & distance).
ALPHA-NUMERIC LED WINDOW: Indicates exercise feedback (speed, calories, incline, heart rate & resistance level).
START/PAUSE: Press to begin exercising. Press to pause your workout and press it again to resume exercising.
STOP/RESET: Press to end your workout. Hold for 3 seconds to reset the console.
ENTER & ARROW KEYS: Used to set your workout and change workout settings.
SELECT GOAL: Press to select a time, distance, or calorie-based goal. When no LED is illuminated, no goal is set.
GOAL INDICATOR: Indicates which goal is selected. If you do not set a goal, no LEDs will be illuminated.
SELECT TERRAIN: Press to select a rolling, mountain, or reverse train terrain. When no LED is illuminated, no terrain is set.
TERRAIN INDICATOR: Indicates which terrain is selected. If you do not set a terrain, no LEDs will be illuminated.
CUSTOM PROGRAM 1 & 2: Press either 1 or 2 to workout to custom saved program 1 or 2.
INCLINE ARROW KEYS: Used to adjust incline in 5% increments.
INCLINE QUICK KEYS: Used to reach desired incline more quickly.
LEVEL ARROW KEYS: Used to adjust the resistance level in small increments.
LEVEL QUICK KEYS: Used to reach desired level more quickly.
CHANGE DISPLAY BUTTON: Press to change display feedback during workout.
SPEAKERS: Music plays through speakers when your CD/MP3 player is connected to the console.
MP3 PLAYER POCKET: Holds your MP3 player.
AUDIO IN JACK: Plug your CD/MP3 player into the console using the included audio adaptor cable.
AUDIO OUT/HEADPHONE JACK: Plug your headphones into this jack to listen to music through the headphones.
NOTE: when headphones are plugged into the headphone jack, the sound will not play through the speakers.
A
B
C
D
E
F
G
H
I
J
K
L
M
N
O
P
Q
R
S
CHANGE
DISPLAY
QUICK INCLINE KEYS QUICK LEVEL KEYS
2
4
6
8
10
12
14
16
10
20
30
40
50
60
80
100
O P E N - E N D E D P R O GR A M M I N G
ON-THE-FLY GO AL & TERRA IN ADJUST MENT
ENTER
SELECT
GOAL
SELECT
TERRAIN
CUSTOM
PROGRAM
CUSTOM
PROGRAM
EX-77
GOAL
TIME
CALORIES
OF F
DISTANCE
DISTANCE
TIME
SPEED
INCLINE
CALORIES
HEART RATE
TERRAIN
OF F
ROLLING
REVERSE TRAIN
MOUNTAIN
A
B
C
D
E
H
F
J
L
J
G
K
N
I
M
O
Q
P
P
R
S
EX-77_Rev.1.6.indd 18-19 7/1/08 8:18:19 AM


