


BEFORE
YOU BEGIN
12
INTRODUCTION
IMPORTANT
PRECAUTIONS
ASSEMBLY
BEFORE
YOU BEGIN
BIKE
OPERATION
LIMITED
WARRANTY
TROUBLESHOOTING
& MAINTENANCE
CONDITIONING
GUIDELINES
BEFORE
YOU BEGIN
ASSEMBLY
13
INTRODUCTION
IMPORTANT
PRECAUTIONS
BIKE
OPERATION
CONDITIONING
GUIDELINES
TROUBLESHOOTING
& MAINTENANCE
LIMITED
WARRANTY
BEFORE
YOU BEGIN
ASSEMBLY
A S S E M B LY S T E P 6
Y O U ’ R E F I N I S H E D !
A
004721-00
Z01
005145-A
Z02
B
C
004755-00 Z06
E
004382-00
Z07
F
005165-00
Z04
G
004733-00
Z05
BOLTS (J)
CONSOLE MAST
CONSOLE
WATER BOTTLE
HOLDER
CONSOLE WIRES
WIRES
BOLT (J)
12 mm
Qty: 4
BOLT (J)
12 mm
Qty: 4
HARDWARE BAG 5 CONTENTS:
B E F O R E Y O U B E G I N
CONGRATULATIONS! on choosing your bike. You’ve taken an important step in developing and
sustaining an exercise program! Your bike is a tremendously effective tool for achieving your personal
fitness goals. Regular use of your bike can improve the quality of your life in so many ways.
HERE ARE JUST A FEW OF THE HEALTH BENEFITS OF EXERCISE:
• Weight Loss
• A Healthier Heart
• Improved Muscle Tone
• Increased Daily Energy Levels
The key to reaping these benefits is to develop an exercise habit. Your new bike will help you eliminate
obstacles that prevent you from exercising. Inclement weather and darkness won't interfere with your
workout when you use your bike in the comfort of your home. This guide provides you with basic information
for using and enjoying your new machine.
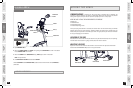
LOCATION OF THE BIKE
Place the bike on a level surface. Do not place the bike in any area that will block any vent or air openings.
The bike should not be located in a garage, covered patio, near water or outdoors.
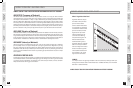
ADJUSTING LEVELERS
Adjust the 4 front and rear levelers so that the bike is level on the floor. Then adjust the center leveler
located under the MAIN FRAME TUBE just so it is snug with the floor.
REAR LEVELERS
CENTER LEVELER
FRONT LEVELERS
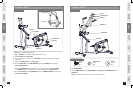
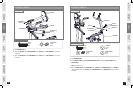
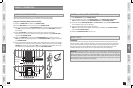
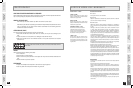
Open HARDWARE BAG 5.
Attach the CONSOLE WIRES to the WIRES running through the CONSOLE MAST as shown in illustration.
Discard ROUTING WIRE when finished.
Attach the CONSOLE to the CONSOLE MAST using 4 BOLTS (J), as shown in illustration.
NOTE: Do not pinch wires.
Slide WATER BOTTLE HOLDER onto backside of CONSOLE.
Connect AC ADAPTOR to the AC ADAPTOR INPUT, located at front of the main frame. Connect ADAPTOR to a
power outlet.
A
B
C
D
ASSEMBLY STEP 6:
B701_Rev.1.4.indd 12-13 7/29/08 9:21:38 AM