


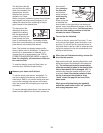

8
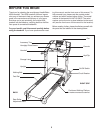
7. Make sure that all parts are properly tightened before you use the treadmill. Note: Extra hardware may
be included. Keep the included hex keys in a secure place; the large hex key is used to adjust the walking belt
(see page 27). To protect the floor or carpet, place a mat under the treadmill. If there are thin sheets of clear
plastic on the decals on the treadmill, remove the plastic.
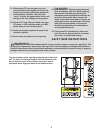
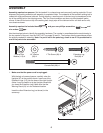
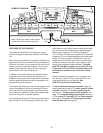
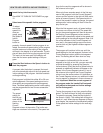
6. Set the Console Base (101) on the Uprights (97). Thread
the four Console Bolts (89) with four Internal Star
Washers (113) into the Uprights and the Console Base.
Be careful not to pinch the Wires (not shown) in the
Uprights. Tighten the two Console Bolts indicated by
the arrows first; then, tighten the remaining two
Console Bolts.
Make sure that the Right and Left Trays (111, 112) are
pressed into the Console Base (101).
89
89
113
101
89
113
111
112
97
97
6
113
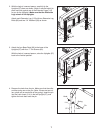
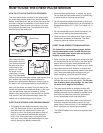
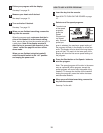
5. See drawing 5c. With the help of a second person, hold
the Console Base (101) near the Uprights (97). Look
u
nder the Console Base and locate the wires on the
sides of the Console Base. Make sure that the wires are
n
ot
r
outed through the openings for the Trays (111,
112). Drawing 5a shows the correct route for the wires.
Drawing 5b shows an incorrect route.
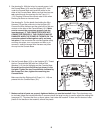
See drawing 5c. Cut the plastic ties holding the Wire
Harness (74) and the pulse wire in the Uprights (97).
Connect the Wire Harness and the pulse wire to the con-
nectors on the sides of the Console Base (101). Make
sure to connect the connectors properly (see the
inset drawings). IF THE CONNECTORS ARE NOT
CONNECTED PROPERLY, THE CONSOLE MAY BE
DAMAGED WHEN THE POWER IS TURNED ON. The
connectors should slide together easily and snap
into place.
If the connectors do not slide together easily
and snap into place, turn a connector and then try to
connect it. Insert the excess Wire Harness and pulse
wire up into the Console Base.
101
97
97
5c
74
Pulse
Wire
5a 5b
Correct
Incorrect
74
112
111