


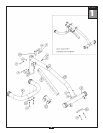


STEP
1
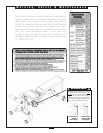
A. Attach front leg (A) to mainframe (B) with brace plate (D) as shown using:
two 29 (square neck carriage bolt 10mm x 95mm)
two 36 (flat washer 10mm)
two 32 (nylon lock nut 10mm)
B. Attach back leg (C) to mainframe (B) with brace plate (D) as shown using:
two 29 (square neck carriage bolt 10mm x 95mm)
two 36 (flat washer 10mm)
two 32 (nylon lock nut 10mm)
C. Attach chrome adjustment tube (F) to the front of the mainframe (B) with the adjustment holes facing
out on the left side as shown. Use the following:
one 24 (hex bolt 10mm x 80mm partial thread)
two 36 (flat washer 10mm)
one 32 (nylon lock nut 10mm)
D. Slide adjustment carriage (E) over chrome adjustment tube (F) as shown with the pop pin knob on the left
side of the bench. (You may have to unscrew the pop pin to slide it on to the chrome adjustment tube).
E. Attach seat pivot (G) to mainframe (B) using:
one 23 (hex bolt 10mm x 110mm partial thread)
two 36 (flat washer 10mm)
one 32 (nylon lock nut 10mm)
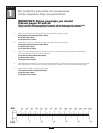
3
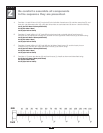
mm
Inch
Be careful to assemble all components
in the sequence they are presented.
IMPORTANT! Before you begin you should
fold-out pages 42 and 43.
This is a quick reference guide that shows all hardware parts (in actual size)
along with the corresponding key numbers on the assembly instructions.