


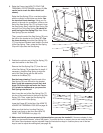
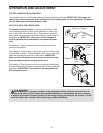
10. Make sure that all parts are properly tightened before you use the treadmill. If there are sheets of clear
plastic on the treadmill decals, remove the plastic. To protect the floor or carpet, place a mat under the tread-
mill. Note: Extra hardware may be included. Keep the included hex keys in a secure place; one of the hex
keys is used to adjust the walking belt (see page 18).
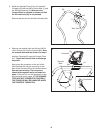
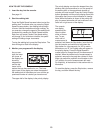
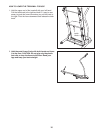
9. Position the cylinder end of the Gas Spring (76)
near the bracket on the Base (79).
Remove the Gas Spring Clip (77) from the end
of the Gas Spring (76) as described in step 8. If
necessary, rotate the Gas Spring to align the
end of the Gas Spring with the ball on the
bracket on the Base (79).
See the lower drawing. Press the end of the
Gas Spring (76) onto the ball on the bracket.
Note: It may be necessary to pull the Latch
Knob (70) to the right and move the Frame
(87) forward or backward as you press the
Gas Spring onto the ball.
Next, insert the end of the Gas Spring Clip (77)
into two of the small holes in the end of the Gas
Spring (76). Then, rotate the Gas Spring Clip
until it clips onto the Gas Spring.
Lower the Frame (87) to the floor. See HOW TO
LOWER THE TREADMILL FOR USE on page 16.
Make sure that the four Leveling Feet (not
shown) rest firmly on the floor (see HOW TO
LEVEL THE TREADMILL on page 14).
76
77
76
77
87
Bracket
Bracket
7
7
77
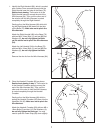
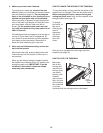
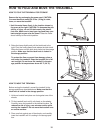
8. Raise the Frame (see HOW TO FOLD THE
TREADMILL FOR STORAGE on page 15). Be
careful not to crack the Motor Hood (not
s
hown).
R
aise the Gas Spring (76) to a vertical position
with the cylinder on the bottom as shown. See
the two small inset drawings. Using your fin-
gernail or the end of a screwdriver, press on the
end of the Gas Spring Clip (77) to loosen it from
the Gas Spring. Next, rotate the Gas Spring Clip
and pull it out of the Gas Spring. Be careful to
avoid losing the Gas Spring Clip. Note: Extra
Gas Spring Clips are included.
Then, press the end of the Gas Spring (76) onto
the ball on the bracket on the Frame (87). See
the lower drawing. Insert the Gas Spring Clip
(77) into the two indicated small holes in the end
of the Gas Spring. Then, rotate the Gas Spring
Clip until it clips onto the Gas Spring.
77
76
Holes
77
76
9
Bracket
Holes
10
79
Cylinder
70
87
8
70