


15
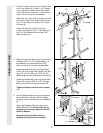
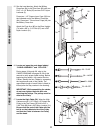
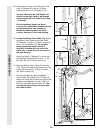
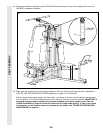
29. Attach the end of the Low Cable (23) to the
Long ÒUÓ-Bracket (57) with a 1/4Ó Nylon
Locknut (2) and a 1/4Ó Flat Washer (10).
You may need to lift the Top Weight (not
shown) on the High Cable to get enough
slack to attach the Low Cable to the Long
ÒUÓ-Bracket.
Do not completely tighten the Nylon
Locknut (2). It should be threaded onto the
end of the Cable so only a couple of
threads are showing above the Nylon
Locknut, as shown in the inset drawing.
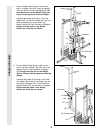
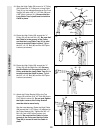
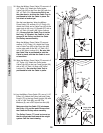
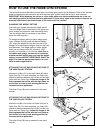
30. Locate the Military Press Cable (72). Attach
the Military Press Cable to the other Small
ÒUÓ-Bracket (71) with a 1/4Ó Nylon Locknut (2)
and a 1/4Ó Flat Washer (10). Do not com-
pletely tighten the Nylon Locknut. It
should be threaded onto the end of the
Cable only a couple of turns, as shown in
the inset drawing.
Attach the Small ÒUÓ-Bracket (71) to the indi-
cated Weight Tube (63) with a 5/16Ó x 1 3/4Ó
Bolt (24) and a 5/16Ó Nylon Locknut (3).
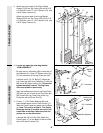
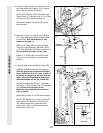
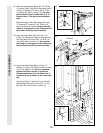
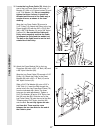
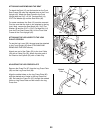
31. Wrap the Military Press Cable (72) around a
3 1/2Ó Pulley (15). Attach the Pulley to the Top
Frame (55) with a 3/8Ó x 2Ó Bolt (12) and a
3/8Ó Nylon Locknut (21).
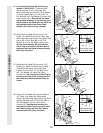
See the inset drawing. Wrap the Military
Press Cable (72) around a 3 1/2Ó Pulley (15).
Attach the Pulley and a Cable Trap (66) to the
bracket on the Stabilizer (5) with a 3/8Ó x 2Ó
Bolt (12) and a 3/8Ó Nylon Locknut (21). Be
sure that the Cable Trap is turned to hold
the Cable in place.
30
29
10
CABLE ASSEMBLY
57
23
24
63
71
10
2
3
72
2
2
10
57
23
72
10
2
71
31
5
Bracket
66
12
72
15
15
21
21
55
12
72