


GB
O W N ER ’ S M AN U AL
7
TARGET HR, TARGET EFFORT, PROGRAMS, T-
RIDE, OWN TRAINING and FITNESS TEST.
4. USER
Press the USER button to open the USER menu. The
USER menu includes the following functions: CREATE
USER, SELECT/CHANGE USER, EDIT USER,
DELETE USER, SETTINGS and USER LOG.
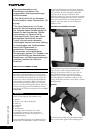
5. SELECTION DIAL
The selection dial functions in two ways:
A) Rotating the dial. By rotating the dial clockwise, you
can scroll the menus downwards or to the right, and
increase values or resistance. By rotating the dial anti-
clockwise, you can scroll the menus upwards or to the
left, and decrease values or resistance.
B) Pressing the dial. By pressing the dial, you can accept
the selection you made when rotating the dial. During
training, you can accept the function displayed at the
bottom centre of the display.
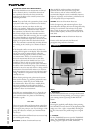
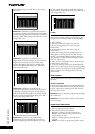
DISPLAY
During training, you can see the following training
values on the left side of the display: time, distance,
energy consumption, effort, RPM, heart rate and speed.
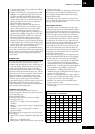
OPERATING THE CONSOLE
To activate the meter, connect the device to a power
source, and then press any key or start pedaling. The
meter will now display the TRAINING menu. If you
do not press a key, or pedal for more than 5 minutes,
the meter automatically switches off.
The values in a workout that has been interrupted
are saved in the memory of the user interface for 5
minutes, after which they are reset. You can restart the
interrupted exercise by pedaling within 5 minutes.
On the display, you can see advice messages. They are
preceded by the letter i on a white background. You can
remove the messages from the display by pressing the
selection dial.
This equipment (E60 2
nd
Generation) is compatible
with the T-Ware
TM
fitness testing and monitoring PC
program. You can take the T-ware program into use by
installing the T-Ware
TM
to your PC and by connecting
the meter to the PC with the USB cable. You’ll find
additional information about the T-Ware
TM
at Tunturi’s
website at www.tunturi.com.
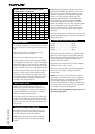
USER MENU
You can access the USER menu by pressing the USER
button. We recommend that you choose a user code
and save your personal details: these details are needed
e.g. for a more accurate estimation of your energy
consumption. At the same time, you can set the units to
be displayed and check the total training values. If you
select a username, you can save your training session
and display your personal heart rate levels in different
colors when training according to your heart rate. Once
you have created a username or started to use an existing
username, you can see it at the top right corner of the
display. You can also exercise without a username. If you
do this, a username will not be shown on the top right
of the display, and the default settings (45 years, 70 kg,
male) will be used for your training session. You can
save user data for up to 20 different users.
IMPORTANT! If you wish to view your personal training
sessions saved on the USER LOG, always remember
to select your own username. You can also start using
a username in the middle of your training session by
pressing the USER button and then selecting your own
username. Your training session will not be interrupted.
After selecting your username, you can return to the
training data by pressing the BACK/STOP button.
IMPORTANT! If you want to save your training session,
you must select a username.
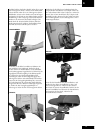
CREATE USER
To create a user:
1. Press the USER button. The USER menu appears.
2. Select CREATE USER by rotating the selection dial.
Confirm your selection by pressing the selection dial.
3. Select a language by rotating the selection dial and
confirm your selection by pressing the dial.
4. Enter your name. Move from one letter to another by
rotating the selection dial. Confirm the selected letter by
pressing the selection dial. Once you have entered your
name, select OK and press the selection dial.
5. Select the units you wish to use. (Metric 1 (kg, km,
kcal), Metric 2 (kg, km, kJ), or the corresponding
imperial units Imperial 1 (lb, mi, kcal), Imperial 2
(lb, mi, kJ)). Make your selection by rotating the
selection dial, and confirm by pressing the dial. You will
automatically be taken to the next setting.
6. Select the target display for the set values. COUNT
DOWN shows the values as they decrease from your
target toward zero. COUNT UP shows the values as
they increase toward your target. Confirm your selection
by pressing the selection dial. You will be taken to the
next setting.
7. Set your gender by rotating the selection dial.
Confirm your selection.
8. Set your age. Confirm your selection.
9. Set your height. Confirm your selection.
10. Set your weight. Confirm your selection.
11. Set your maximum heart rate. The meter calculates
your estimated maximum heart rate using the formula
220 - age. If you know your exact maximum heart rate,
you can adjust the estimated maximum heart rate given
by the meter.
12. Set your anaerobic threshold. The equipment uses
your maximum heart rate to calculate an estimate of
your threshold heart rate (80% of your maximum heart
rate). If you know your exact anaerobic threshold heart
rate, you can adjust the estimate given by the meter.
13. Set the aerobic threshold. The equipment uses your
maximum heart rate to calculate an estimate of your
threshold heart rate (60% of your maximum heart rate).
If you know your exact aerobic threshold heart rate, you
can adjust the estimate given by the meter.
IMPORTANT! The meter can store up to 20 usernames at
a time.