


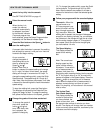

7
4. Finger tighten two Long Upright Bolts (54) into the right
Upright (23) and the Base (101) as shown. Next, finger
tighten two of the four 1” Upright Bolts (33) with two of the
four Internal Star Washers (32) into the right Upright. Do
not tighten the Bolts yet.
Attach the left Upright (not shown) in the same way.
(Note: There is not a wire harness in the left Upright.) Do
not tighten the Bolts yet.
4
32
33
33
54
101
23
23
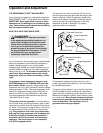
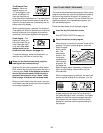
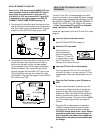
5. Have a second person hold the Handrail (27) near the
Uprights (23). Refer to the inset drawing. Slide an O-ring
(117) onto each Upright (23). Connect the Handrail Wire
Harness (30) to the Upright Wire Harness (100). Make
sure that the two connectors snap together. Insert the
Wire Harnesses into the Handrail (27) and the right
Upright (23).
Slide the Handrail (27) onto the Uprights (23). Be care-
ful not to pinch the Wire Harnesses (30 and 100).
Finger tighten two Handrail Bolts (25) with Handrail Star
Washers (26) into each side of the Handrail (27). Note: If
the Handrail Bolts do not line up with the holes in the
Uprights (23), roll the O-rings (117) onto the thicker parts
of the Uprights. After the Handrail has been attached, roll
the O-rings over the joints where the Handrail and the
Uprights meet.
Tighten all of the bolts used in steps 4 and 5.
5
25
27
26
25
26
23
23
23
27
100
117
30
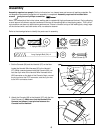
6. Make sure that all parts are tightened before you use the incline trainer. Keep the included allen wrench in
a secure place. The allen wrench is used to adjust the walking belt (see page 22). To protect the floor or car-
pet from damage, cover the floor beneath the trainer.
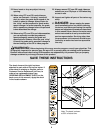
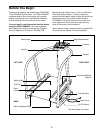
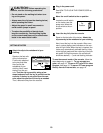
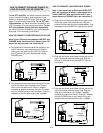
3. Identify the right Upright (23), which has the Upright Wire
Harness (100) inside of it.
Have a second person hold the right Upright (23) near the
Base Wire Harness (41) on the right side of the Base
(101). Connect the Upright Wire Harness (100) to the
Base Wire Harness (41). Make sure that the two connec-
tors snap together. Pull the excess Upright Wire Harness
out of the top of the right Upright.
Slide the right Upright (23) onto the Base (101). Be care-
ful not to pinch the Wire Harnesses (41 and 100).
100
41
23
101
3