


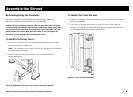


3. Slide the bottom edge of the front shroud into the space between
the exercise station and the weight stack frame.
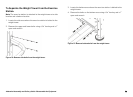
4. When the plastic hooks on the front shroud line up with the large
square holes at the top of the weight stack frame, place the hooks
into the holes. A second set of hooks halfway up the shroud fits into
holes in the weight tower frame. If necessary, lift the front shroud
until the hooks drop into their holes in the weight tower frame and
lower shroud until the hooks are supporting the shroud on the
frame.
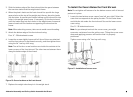
Note: When attaching screws, take care to avoid cross-threading.
5. Attach the bottom edge of the front shroud using:
Four ¹⁄₄”- 20 buttonhead screws
6. Leave the screws slightly loose until all four of them are attached
and the front shroud is positioned correctly, and then tighten them
using the ⁵₃₂” hex key until snug.
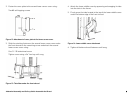
Note: Two of the four screw locations are inside the sockets at the
lower corners of the front shroud. The other two are between them
along the bottom edge of the shroud.
Figure 10: Screw locations on the front shroud
7. Replace the weight selection pin in the weight stack.
To Install the Covers Below the Front Shroud:
Note: Do not tighten all fasteners for the bottom covers until all shroud
parts are in place.
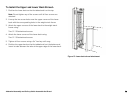
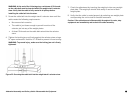
1. Locate the two bottom corner covers (one left, one right). Select the
cover that corresponds to the pulley location. Tilt the cover down
and slide the tab under the front shroud. Secure the lower corner
cover using:
One ¹⁄₄”- 20 buttonhead screw
Note: As you attempt to attach the corner cover, you might
encounter resistance from the pulley cover. Tilting the corner cover
down and applying pressure will ensure that it is properly
positioned.
Tighten screw using a ⁵₃₂” hex key until snug.
Figure 11: Installation of corner cover
Abdominal Assembly and Delivery Guide: Assemble the Shroud
8