


page 19
COMMERCIAL PRODUCTS DIVISION
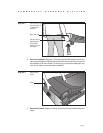
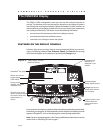
15. Connect the power cord. Make sure that the ON/OFF (I/O) power switch,
located on the front panel of the treadmill, is placed in the OFF (O) position
and then, take the following steps.
a. Remove the power cord from its packing material.
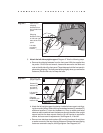
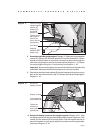
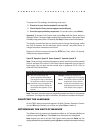
Diagram 18
Loosen the
bracket.
Front panel
1
Bracket
Phillips head
screwdriver
Power receptacle
2
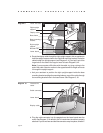
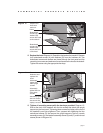
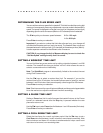
Diagram 19
Attach the
power cord to
the unit.
Front panel
Tighten the bracket
once the power
plug is seated
securely.
Power plug
Phillips head
screwdriver
b. Use a phillips head screwdriver to loosen the bracket attached to the
power receptacle located on the front panel. Diagram 18, #1.
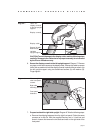
c. Align the pins in the receptacle with the end of the power cord and plug
the power cord into its receptacle. Diagram 18, #2. If the pins are properly
aligned, the end of the power cord firmly snaps into the receptacle. If you
don’t feel that the end of the power cord is secure, remove it, realign the
pins, and plug it back in. It is imperative that the power plug is firmly
seated inside its receptacle. Ensure that the pins are aligned and properly
connected to avoid damage to the treadmill and power cord.
d. Use the screwdriver to tighten the bracket. Diagram 19. Tightening the
bracket minimizes the potential for damage to or misalignment of the
power cord.
CAUTION: The treadmill requires a dedicated, grounded circuit. A 20
amp dedicated circuit is recommended. Make sure that no other
product or machine uses the same circuit as the treadmill. Refer to
Grounding Instructions
on page 3.