


13
GAME REPAIR
8. Remove bolts holding playfield in place near
bottom of the glass.
9. Install new glass from the inside of the game and
drop into channel in the playfield.
10. Reinstall retainers, lights, brackets, marquee,
playfield bolts and rails in reverse order.
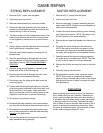
PLUSH RETAINER WALL
REPLACEMENT
1. Remove all A.C. power from the game.
2. Unlock and open front door
3. Carefully remove the (2) 1/4-20 nuts holding the
plastic plush retainer / wall to the side of the
game.
4. Remove old plastic plush retainer wall
5. Reassemble in reverse order using new plastic
plush retainer wall.
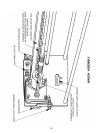
REMOVAL OF CRANE
MECHANISM
1. Remove all A.C. power from the game.
2. Unlock and open the front door.
3. Slide the crane assembly to the front center of
the game.
4. Loosen black thumb screw securing the front to
back micro track bracket in place. The thumb
screw is located on the front face of the crane
assembly nearest the door.
5. Slide the micro track bracket forward and up to
disconnect it from the crane assembly.
6. Carefully lift the entire crane assembly off the
rails approximately 2 inches, shift to the left as
far as possible, drop the right side down past the
right crane rail and slide the entire assembly out
from between the two separator rails.
7. The crane assembly can now be removed from
the cabinet so necessary maintenance / repairs
can be made
8. Reassemble in reverse order.
REMOVAL OF CRANE
MECHANISM
1. Remove all A.C. power from the game.
2. Unlock and open front door.
3. Remove crane assembly as detailed previously.
4. Loosen black thumb screw securing the micro
track bracket in place. The thumb screw is lo-
cated on the upper right face of the wagon as-
sembly at rear.
5. Slide the micro track bracket to the right and up
to disconnect it from the wagon assembly.
6. Carefully lift the entire wagon assembly off the
rails and rotate clockwise until the left front wheel
clears the front rail.
7. Lower the front of the wagon assembly and re-
move the assembly from between the two rails.
8. The wagon assembly can now be removed from
the cabinet so necessary maintenance / repairs
can be made.
9. Reassemble in reverse order.